Saturday, January 19, 2019

Easy Wonder Clip Bowls

I've been working on some more little sewing projects. Little things are so fun because they go together fast, and suddenly you have a completion! Yay!

So here we have three little... pea pods???


Below is the first one I made, to match my Honeycomb Basket and Pixie Basket. It's an Easy Wonder Clip Bowl, from the pattern by Birdcage and Thread which can be found here. I love it, as it's very handy to use. It's low profile so doesn't get in your way, yet it holds over 50 Wonder Clips easily, and it opens wide, due to the zipper and the round bottom.


They're easy to make, so I decided to make a couple more. I wanted one of them for the larger size Wonder Clips, big enough to hold at least a package of 24, which is what I have. I had to figure out how much to enlarge the pattern. I only had one #3 zipper long enough (20") to do the job, so I calculated how much I could enlarge the pattern and still fit the zipper. I came up with 20%. I printed the pattern but was not sure it was going to be big enough, so I decided to split the side piece down the center, adding ½ inch. I needed to keep the top and bottom curves the same, but since that didn't leave me with a straight edge on the side opposite the folded edge, I drew a line to connect the two corners, giving me a new seam line.


Hopefully you can see and understand what I meant. Below is the finished pattern piece.


Here's the comparison of sizes of the bowls flattened, before finishing.


Sewing the round bottoms was a bit fiddly, but very doable.


And voilà! ...the two finished Easy Wonder Clip Bowls!


The larger one easily holds the 24 clips with room to spare.


When you purchase the pattern, you also get access to a video tutorial. It's nicely done and has some helpful tips, including how to put zipper pulls on.

Back to the zipper part, I used the same single zipper to make both of those bowls. You only use one side of it per bowl. Of course it requires an additional zipper pull, but I had a package of various colors on hand. However, I learned that not all pulls are created equal! My zipper was a Talon one, and my pulls were YKK. The pulls would NOT close the zipper, no matter how many times I successfully got it put on. I finally had to go dig up another Talon zipper and cut the pull off that. Talon zips aren't the quality of YKK ones... they just don't slide as nicely. I'd gotten mine when we still had a local store that sold zippers, and that was the only kind they had. Now 99% of my zipper supply are YKK, most of which I've gotten from ZipIt, which I cannot recommend highly enough - great prices, great service, fast shipping!

Friday, January 11, 2019

Retail Therapy Reusable Shopping Bag

My favorite pattern writer, Erin (Erickson) Gilbey, from Dog Under My Desk, has been at it again. Just before Christmas, she came out with another sweet pattern. I didn't have time to test it then, but I did proofread it for her, and last week I finally got around to sewing one myself. Here it is.


If you haven't already guessed from the blog title, it's the Retail Therapy Reusable Shopping Bag, the pattern for which can be found here. It was easy and fast to sew and was also delightful because there was no interfacing, zippers or hardware to deal with. I used a KAMsnap closure for mine because I think they're pretty besides being easy and fun to install. As you can see, the bag folds up pretty small and can maybe even fit in your purse. (I also had the idea that if it doesn't fit IN your purse, you could use the strap to fasten it to your purse handle.) Here's what it looks like unfolded.


It's not lined but just has a facing, which makes for a smaller rolled-up bag.


It's BIG, and holds a lot of stuff. Annabelle offered to give you a little size reference along with the groceries.


The pattern is written with Erin's usual attention to detail, with lots of helpful photos, and she has a great method for putting it together. It also makes a great stash-buster if you have some fabrics you don't know what to do with anymore. My outer fabric has been around here for possibly 30-40 years! Yikes!!

Wednesday, January 2, 2019

Christmas gifts - Accordion Pouches

WHOA! Where does the time go?! It's been a month since I last posted - aargh! There are a couple of reasons for the delay, though. The first is my wrist. Although it's healing well, two of the things that bother it the most are writing and typing for any length of time. I guess it's just from having it tensed in one position that long. It gets stiff and sore pretty fast.

The other reason is that although I did some sewing, I couldn't show it to you because the items were for Christmas gifts, and I of course didn't want to spoil anyone's surprise. All gifts have been received now, so here they are. 


I was having sewing withdrawals, but because cutting was challenging for my wrist, I needed projects that were simple and not a lot of work. These pouches fit the bill! There were only two small pattern pieces.


Aren't they just too cute? I started out with just this one below, made from a Glimmer Solids fat quarter that I'd gotten from Cloud9 Fabrics awhile back and lining scraps from another project. These pouches are great scrapbusters because they require so little fabric. I don't know how well you can see the sparkles in this next photo, but they're so pretty, and I thought Courtney would like this pouch.


Here's what the inside looks like. I even remembered to add my label... after I'd sewn it together (insert rolling eye emoji here - ha), but with a little wrangling I was still able to sew it on with the machine. (Otherwise, glue works very well, I've found.)


That one went so well and I liked it so much (and needed to do more sewing to keep the withdrawals at bay) that I decided to make a few more for gifts. These first two are made from various fabrics from Jess's Typography line (now out of print) of quilting cotton.


I also had some scraps of oilskin and Jess's newest Business Class rayon that I'd made this Jack Tar bag from, and I thought the oilskin would make a cool masculine pouch. The rayon has always reminded me of camouflage, so I thought it'd work for the inside (and besides, it can be a little reminder of his wife for the recipient ;) ). I almost sorta like this one the best!


In case you'd like to make some of the pouches yourself, you can find the free video tutorial here. It's by Shabby Fabrics. There's also a video tutorial by Darvanalee Designs Studio that has some helpful hacks that I used successfully, and it can be found here. The pattern pieces are here (and note that the first page, which looks like just a rectangle with instructions, is actually a pattern piece). Thanks to eSheep Designs for putting me on to another fun must-make tutorial.

As a followup to my last post, here's a photo of our new linoleum. I LOVE it!! It's so much easier on the eyes than the old stuff, and it's also much quieter. (This photo doesn't begin to do it justice.)


It's noticeably more cushioned than our old floor. Although it has a 50-year warranty, it's recommended that we no longer use the casters on our dining chairs. So we got some of these bell-shaped slider thingies to protect the floor.


To be honest, I hate them. They slide, but they're much harder to move than any kind of roller. Grandpa doesn't mind them, but maybe that's because his legs are longer and stronger than mine. I also tried felt on the bottoms of them, but that didn't help, either. I continue to put up with them, but if anybody has any better suggestions, I'd love to hear them!

Also, since our casters matched the chairs, these black things reminded me of photos or videos you see of dogs wearing boots for the first time and walking so funny. ;-Þ

(Sorry, I don't know who to credit for the copyright.)

Right??? ;-D

Well, my wrist is complaining again, so I'm outta here. I do have a couple new sewing projects in the works, so hopefully I'll be back again before too long.

Monday, December 3, 2018

Triple Zip Pouch #9, and updates!

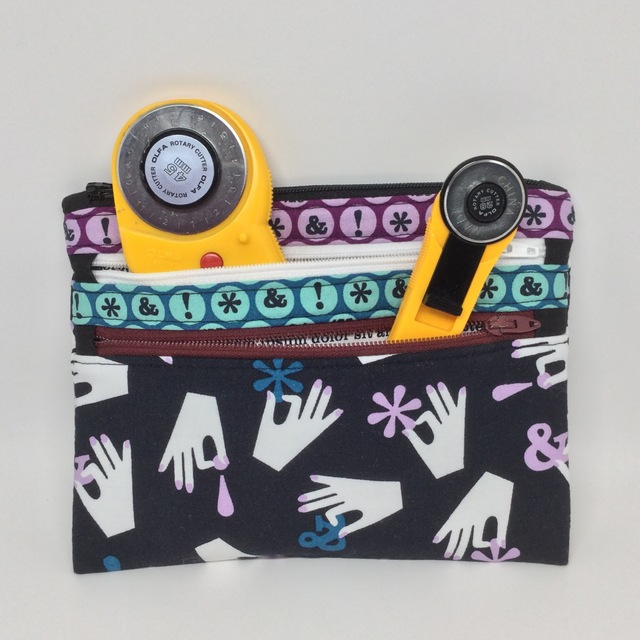
You might think I've lost it and am posting a rerun, but it's not so! This will look very familiar for a reason. Back in August I made a gift for a friend, and she likes it so much that she asked me if I would make one similar for a birthday gift for a special friend of hers! That was a great compliment to me, and how could I refuse? So here's my 9th Triple Zip Pouch, from the tutorial by Debbie Jeske. Again, the fabrics are from Jess's Typography line.


Here are the two together:


They just different enough so the gals won't get them mixed up if they happen to be together when using them.

I love this tutorial and always enjoy making these pouches. The end is like magic when you turn it right side out and the finished pouch appears!

They're the perfect size for rotary cutters, but they're useful for any number of other items... infinite possibilities!


An update on my wrist: It's been well cared for, as you can see below.


The cast came off two weeks ago today - hurray! Here's my scar, hiding the titanium plate and 9 pins.


The scar is much improved since that photo. I've been going to occupational therapy, but my therapist is on vacation this week, so I'm just doing the exercises at home. Flexibility and strength have improved a lot, but gosh darn it it gets stiff and sore sometimes. Writing and typing seem to be the worst culprits for making it sore. Ugh. So I'd better quit here soon. Oh, and BTW, with all the therapy appointments and home exercises, I haven't even had time to tackle any sewing projects. I'm not sure how the wrist will handle rotary cutting. I'm hoping my ergonomic Martelli cutters will go okay.

One more update before I quit... my kitchen floor is getting a new look! I've hated this linoleum for so long, and it finally started wearing out, after 40 years! This was a last shot that I took this morning. As of right now, it's been skim-coated and the new linoleum will go over the top of it tomorrow.


Woohoo!  I can't wait for it to be done!!

Thursday, November 1, 2018

AG Doll Go Everywhere Anorak Jacket

Yes! I sewed! Broken wrist and all. I was having withdrawals, so I just had to give it a try. It wasn't too bad... but pressing was a challenge. I won't be doing a lot of that for a while. Since typing on this keyboard is a challenge, too, I'm going to keep this short and sweet.

This is the Go Everywhere Anorak Jacket, and the pattern is from Pixie Faire. I had it about 90% done before my accident, so it didn't take long to finish it up. (Well, sorta... with a broken wrist, EVERYTHING takes a long time.)


It was easy to sew, and I love how it turned out. I made it from some brushed denim that I've had around here for probably 25+ years. Here are some progress pics.


Only the hood is lined. The inner seams are all finished with the serger.

Wonder clips were once again very useful.


I was so happy to get it finished, and I had just enough time to take advantage of the "golden hour" sunlight for photos. I knew the jacket would look good against the fall colors outside... but it was so windy that I had to prop Kit against the sedum to keep her from falling over. It worked, and I was very pleased with the photo quality.


So that's that. I'm itching to sew something else now (also itching inside my cast once in a while). I haven't tried rotary cutting yet, and I'm sure that'll present another challenge, but I have three different kinds of cutters, so surely one of them will work, right? I hope!

By the way, here's my "upgrade". Thankfully, it's much more streamlined, the best part of that being that it fits inside many of my sleeves, especially my winter coats!


Only about 2½ weeks to go........