Showing posts sorted by relevance for query triple zip pouch. Sort by date Show all posts

Tuesday, February 12, 2013

Triple-Zip Pouch #5

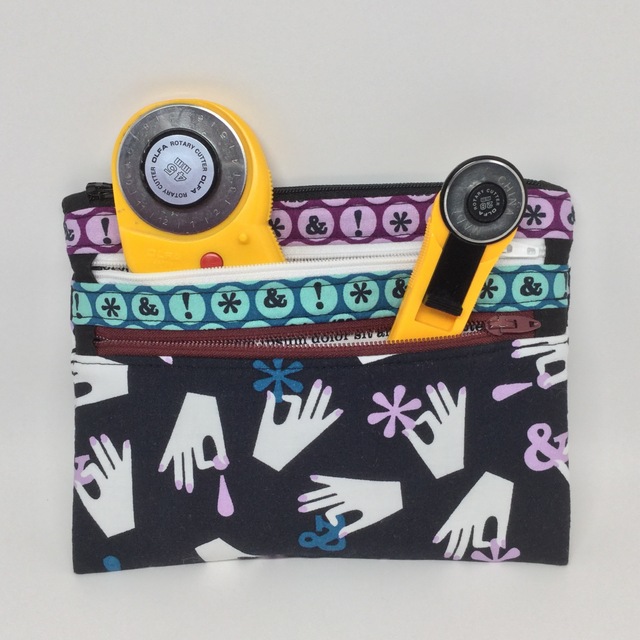
As many of you may recall, I am addicted to making this Triple-Zip Pouch. Yep, this is my 5th one of them. You can see the others here.

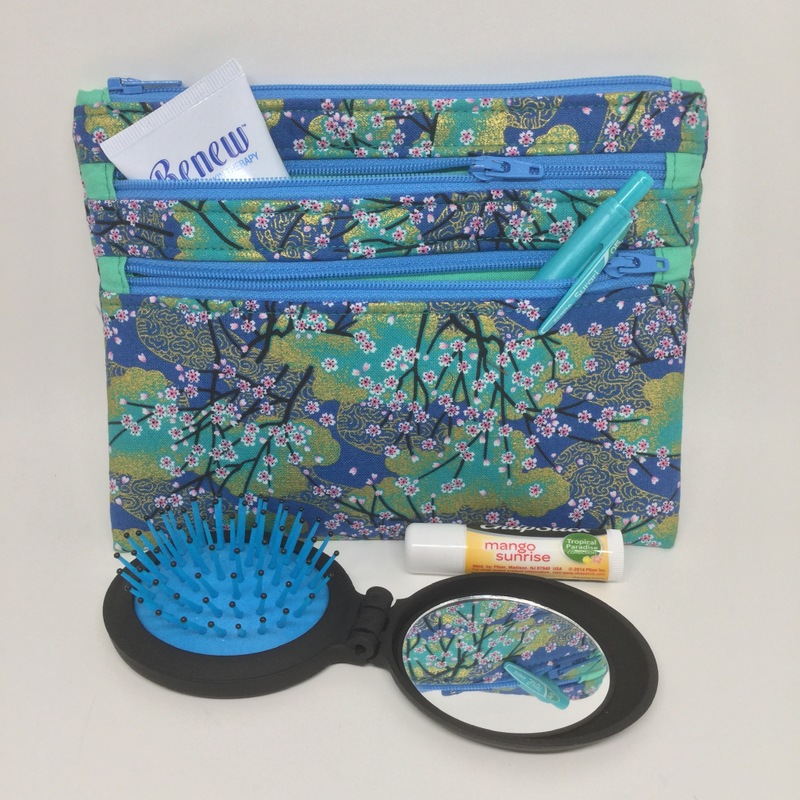
Way before Christmas, I'd decided to make one more and had picked out the fabrics for it. My friend, Cindy, who had made and personally delivered this quilt to me all the way from California last summer, was also kind enough to give me the leftover fabrics from the quilt! How sweet is that?! So I couldn't resist putting them into my favorite little pouch. However, I procrastinated Christmas came up too fast and I didn't get it made.

Then Debbie, the author of the Triple-Zip tutorial, decided to have a Triple-Zip Sew-Along. That was just the incentive I needed to get my 5th pouch done. And here it is:


This particular pouch has one little flaw, though. As you may have noticed, the main fabric is directional, which means I had to cut and seam it at the bottom so the cats wouldn't be upside-down on the back of the pouch. I measured very carefully, but for some reason, the seam ended up about a quarter inch onto the front of the pouch. It bugs me. Oh, well... the pouch is just for myself, and I can live with it, I guess. Once I stuff it full of something, it probably won't be so noticeable.


You should see all the Triple-Zip Pouches others have made! There are over a hundred of them so far in the Triple-Zip Flickr group!! Maybe you'd like to give one a try, too. The sew-along doesn't end until Friday, so it'd be easily doable! Go for it... you'll be glad you did, because they're so fun to make! I might even make more! ;)


Monday, October 8, 2012

Triple-Zip Pouch #4

Hi. My name is Grandma G. I am a triple-zip pouch addict.


And there's the proof. Pouch #4 from this tutorial. Can I help it they're so fun to make?

This one was a test, of sorts. I just wanted to see if sewing with interfaced quilting cotton was much easier, especially for turning the corners, than with the home dec weight fabric I used for the other three. Conclusion: it did make turning the corners 'slightly' easier, but not enough to be worth the extra time and effort to cut and fuse interfacing, in my opinion. I also thought it might make sewing over the thicknesses of the tabs, etc., at the ends of the zippers easier, but it didn't help much. I think my zipper foot is just kinda fussy about that.

All in all, I think I prefer the home dec weight fabric, but just by a little. I like the fabric combination on this pouch. They're all from Michelle Bencsko's Shade Garden.

Will/can I give up making those pouches? That remains to be seen. I have no plans for any more at the moment. However, it might be fun to try other sizes, so I may have to experiment someday.......

Linking up to Amylouwho's Sew & Tell.....

Thursday, September 27, 2012

Triple-Zip Pouch

Hi! I'm back... sorry for the absence. I just got really busy with other things, and I also kind of ran out of photos to post. But now I have photos, and I can also show you some of what I've been up to! I've been doing my bag lady thing again. I ran across a sweet tutorial here for a Triple-Zip Pouch. Debbie's looked so cute that I couldn't resist making one myself! Here it is:


And then I couldn't resist making another one!  Here it is:


Aren't they cute and fun?!


The fabrics, of course, are from Jess's Outside Oslo line.

I plan to use the first pouch to hold my rotary cutters, extra blades, etc. It's the perfect size!


I'm going to gift the second pouch to a friend. And then I'm going to make another one! For guess who? Yeah, you probably guessed... for Miss Courtney. She requests hers to be blue, green and pink. :) I'll show you when I get it done.

I wrote a little review of the tutorial for Jess's blog. If you're interested in a few more details, hop on over there and see all my exclamation marks! :)

Linking up to Amylouwho's Show & Tell...

Monday, September 21, 2015

Triple Zip Pouch #7

I decided to do a little "scrapbusting" with what I had left of Jess's Typography fabrics. Since I had inherited my mother-in-law's rotary cutters after she passed away, I needed somewhere to store them besides a zip-lock bag. I think the perfect storage solution is a Triple Zip Pouch, since that's what I use for my other set.

At the link above is a free tutorial. The little pouches are so fun to make, as well as pretty quick. The hardest part is deciding the fabric/zipper combo - so many possibilities! This time I went with just one fabric on the outside. It was the only thing I could make work with the zippers I had on hand, and I like it this way!


Zippers are so fun! Inexperienced sewers fear them, but really, in a bag they're so easy!


(Now if the camera would've just gotten the colors right. Aargh. The fabric color is really teal, and the orange zipper is more like in the other pics, which were taken with my iPad.)

For the linings, I used the leftover Lorem Ipsum, and since there wasn't enough of the teal to do all the pockets, I used the purple, too. I don't care if the linings are perfectly color coordinated, and I think the different colors are kind of fun, too.


The cutters fit perfectly in there. And the smallest pocket can hold the spare blades.


I've made a number of these pouches (6, in fact) before. You can see them all here. I've gifted some, and others I'm using (and there's one I can't figure out what I did with, but it's probably buried under some fabric somewhere - ha!). They're good for so many things, like Sharpee markers, for example, which is what I use this one for.


The front one below, which was my first one ever, is still my favorite. It contains my original set of rotary cutters, and it gets a lot of use!


I do my main cutting upstairs on the kitchen table, so that set stays up there. This new pouch will stay down in my sewing room where I've added a small cutting mat for those little trim jobs that I don't want to have to run upstairs and dig everything out to cut.

So that's my latest sewing project. I think for the next one, I'm going to do something totally different. And you probably won't get to see it - ha! Think on that one awhile. ;)

I mentioned in a previous post that someone was making something out of ALL the Typography fabrics. Have you guessed what it could be? Well, it's finished, so you can see it now. I have a friend who is an awesome quilter. You can see a quilt she made for me here. I recommended her to Cloud9 as a possibility for making a quilt out of Jess's fabrics (what else would take that many different fabrics?), and they decided to use her. She was thrilled to do it, and she did a wonderful job. They gave her the design they wanted her to make, and she had to figure out how to make it work! She sure did! You can see the quilt here. And if any of you quilters out there are interested, I believe the pattern is going to be free!

Friday, August 31, 2018

Triple Zip Pouch #8 and more

I've been scrapbusting again! I wanted to make a gift for a special friend who is retiring as of today. This friend has also been my hairdresser for somewhere around 25 years!! That's a heckuva lot of haircuts (and maybe a few perms back in the day)!! Today was my last one from her, sadly. In fact, I was her very last client.

She has always been interested in Jess's fabrics, so of course a gift made out of some of them was in order. I went to one of my favorite tutorials, the Triple Zip Pouch by Debbie Jeske (you can see some others that I've made here), and I chose Jess's Typography fabrics. So here you have it! Rather a fun combination, right?


It was so fun, in fact, that I decided to add something else... an Earbud Pouch by Erin (Erickson) Gilbey.


Then I thought about the cord wraps that are so quick and easy to make, so I decided to make one of those, too. I couldn't decide whether to make it reversible or not, so I made one of each! Ha!


I rounded the ends on the reversible one so that it wouldn't matter which way it was snapped... there would always be the round end on the outside, where with the other, if you reversed it, you'd end up with a squared-off end on the outside. Nothing terrible, really, but I like the rounded look better.


Then I quit. Here you have the whole set. She loved it. There may have been a few tears involved.


Love ya, Lori! We'll do that lunch someday and catch up on our cat stories again!

Thursday, May 22, 2014

Triple Zip Pouch #6

I thought I'd take a picture of this project in the process, just for fun. If you saw this, could you imagine what it was going to turn into?


How 'bout from this side?


Well, here it is, all finished! It's a Triple Zip Pouch, my 6th one, in fact. (You can see the others here.) They're so fun (and addictive) to make!


The fabric is Jess's latest, Arrow. I love sewing on home decor weight fabric... except for one thing. Topstitching can easily get wonky because of the coarser weave. I was really disappointed in the topstitching on this pouch, as I think it's my worst ever. The two smaller pieces between the zips were printed a bit off-grain (which is pretty common in any fabric next to the selvage, but I don't know why), so I cut with the print, not the grain. The off-grain-ness made the stitching that much worse. Too bad you can't see the back side of those seams... they're perfectly straight! :) Oh, well....

Here's the back:


It's the perfect size for my rotary cutters and extra blades:


A little size comparison with my Gadget Guard iPad cover:


Very fun!

Monday, December 3, 2018

Triple Zip Pouch #9, and updates!

You might think I've lost it and am posting a rerun, but it's not so! This will look very familiar for a reason. Back in August I made a gift for a friend, and she likes it so much that she asked me if I would make one similar for a birthday gift for a special friend of hers! That was a great compliment to me, and how could I refuse? So here's my 9th Triple Zip Pouch, from the tutorial by Debbie Jeske. Again, the fabrics are from Jess's Typography line.


Here are the two together:


They just different enough so the gals won't get them mixed up if they happen to be together when using them.

I love this tutorial and always enjoy making these pouches. The end is like magic when you turn it right side out and the finished pouch appears!

They're the perfect size for rotary cutters, but they're useful for any number of other items... infinite possibilities!


An update on my wrist: It's been well cared for, as you can see below.


The cast came off two weeks ago today - hurray! Here's my scar, hiding the titanium plate and 9 pins.


The scar is much improved since that photo. I've been going to occupational therapy, but my therapist is on vacation this week, so I'm just doing the exercises at home. Flexibility and strength have improved a lot, but gosh darn it it gets stiff and sore sometimes. Writing and typing seem to be the worst culprits for making it sore. Ugh. So I'd better quit here soon. Oh, and BTW, with all the therapy appointments and home exercises, I haven't even had time to tackle any sewing projects. I'm not sure how the wrist will handle rotary cutting. I'm hoping my ergonomic Martelli cutters will go okay.

One more update before I quit... my kitchen floor is getting a new look! I've hated this linoleum for so long, and it finally started wearing out, after 40 years! This was a last shot that I took this morning. As of right now, it's been skim-coated and the new linoleum will go over the top of it tomorrow.


Woohoo!  I can't wait for it to be done!!

Monday, December 2, 2019

Little bright projects

What a gloomy year it's been, for the most part. So much cloudiness and so much precipitation. Fall was no exception. In fact, I feel like we got cheated out of fall altogether, and since it's my favorite time of year, that's pretty sad. I got tired of the dark dreary days lately and decided it was time for some bright, colorful sewing projects.

Months ago, I received some fabric samples from one of Jess's good friends who is from Japan. (She's the one, in fact, whose baby I sewed the tiny cowboy boots for.) The fabrics were so beautiful, and I wanted to make something special from them. Whatever I made had to be little, because the pieces were about 10" square. The gloomy weather finally inspired me to get going and sew some of them up, and here's what I made:


If you've been following me long, you'll probably recognize the Triple-Zip Pouch from the tutorial by Debbie Jeske. This is actually the 10th one I've made! (See the others here.) Yes, I love them, and they're so quick and fun to make. And isn't that fabric simply gorgeous? Fortunately the print went all directions, because I had to cut the two top pieces the opposite direction from the main piece in order to make it work. I think I have maybe a half-inch strip left. LOL


Here's more of the beauty on the back side. The photos don't even do it justice. The gold is kind of glittery. I was a little leery about ironing it, but it wasn't a problem at all.


I plan to use it to hold things I'd transfer from one purse to another, to make the switch easier. Since I make a lot of bags (huge understatement there), I do occasionally switch which one I carry, just for fun. The bad part of switching is always transferring all the little stuff, and this pouch will make it a breeze.


Just in case you wondered, that bottom item in the photo above is a fold-up brush. The bristles push down inside, and it folds up like a compact. I got it from Courtney for Christmas last year, and I love it!

The other item I made is something useful that I've needed for a long time. Can you guess what it is?


It's folded, like this:


It's a postage stamp holder!


I've made a couple of them before to use as sticker holders. They're very easy to make, and you can see a little tutorial here. I don't use a lot of stamps these days, but what I do have had been stored in a very raggedy envelope that the post office used to put your purchased stamps in... many years ago. It most definitely needed replacing. So now I have this beautiful little stamp holder from lovely Japanese fabrics - yay! I laminated the fabric with Heat 'n Bond iron-on vinyl, and I used a KAMsnap for closure. Perfect! And now I will think of Jess's friend Megumi every time I use the stamp holder or pouch.

I still have a couple of the fabric samples, so if you know of any cute little projects I could make from them, I'm up for suggestions!

Sunday, March 18, 2018

Triple Pouch

I made another pouch. It seems I just can't resist a good pouch. After all, I'm a bag lady, right? And this looked like a rather unique pouch. Not so much from the outside, ...


... but take a look at the inside.


Yes, that's two zippers and three pockets, right? No, wait... it's actually five pockets! There is an optional slip pocket on either side of the center zip pocket.


So it's really a 5-pocket pouch!


I love how it can stand up by itself, even with nothing in it, as below.


I forgot to take a photo for size reference, so here's one I shot later. It measures about 7½" high by 9" wide, so it can hold quite a bit of stuff.


The pattern is the Triple Pouch from the book Stitched Sewing Organizers by Aneela Hoey. Fabrics are from Cloud9 Fabrics (and they were not designed by Jess - heheh). It was somewhat tricky to sew, as you might imagine, but I love how it turned out! Thanks to Rochelle of eSheep designs for pointing me to the pattern.

Now I'm off to do another pattern test.....

Friday, September 28, 2012

Another Triple-Zip Pouch

It was a busy day again today, but I managed to finish up another pouch! This one is Courtney's, made from her requested blue, green and pink.


I went a little crazy and made the linings out of blue, green and pink, too. :)


Three pouches in less than a week.... must be some sort of a record for me!


Really, they're so fun to make that I could make a dozen more! They may just be the most fun sewing item I've ever made.

I was lucky enough to have my little recipient/model arrive via the school bus again this afternoon, so she agreed to let me take a picture of her with it. Sort of.


And then I got this:


It has to be something to do with being FIVE!! Ha! Anyway, she loves it, and she was quite cooperative in playing by herself while I finished it up after she got here.