Monday, October 31, 2016

A new kitty

Another cat showed up at our place yesterday (as if I needed more!). This one was even black - quite appropriate for Halloween. As a matter of fact, this cat was trick-or-treating, too... just a day early. Isn't she about the cutest cat you've ever seen?


Tonight she has plans to go trick-or-treating with a friend, so to prevent it getting too late on a school night, she went to both her grandparents' places yesterday. Smart move, Miss Kitty!

I offered her some of Josie's kitty treats (Annabelle doesn't like treats, can you imagine?!), but she wasn't too keen on that idea. So Josie got those treats, and I gave her what I'd made as her 'real' Halloween treat (she gets enough candy otherwise, so I don't give sugary treats). Here it is.


Courtney loves tiny things, and I'd come across a tutorial (found here) for making these tiny zippy pouches that I thought she'd find lots of possible uses for. The tutorial calls for laminated fabric, because the pouch is unlined and the seams are unfinished, but I suppose you could get by without it if you fused woven interfacing to your fabric. However, it wouldn't leave a very nice view through the vinyl window, plus you'd have to zigzag or serge the seams. I happened to have some scraps of one of Jess's older fabrics that had been laminated, and it worked out very well. It maybe took me all of a half hour to make it. I have a few more scraps left and might even make a couple for myself to hold sewing notions like empty bobbins or something. Fun!

You can see how small it really is in the pic above where Courtney's holding it. Yep, pretty tiny!

Just to make sure she'd have something to put in it right away last night, I also got her a couple of Shopkins to go with it. They are pictured below in their little backpack cases before Courtney opened them.


The trouble with Shopkins is that you don't know what you're getting in the 2-packs. That's also a good thing in that you don't have to worry about whether you're picking something they already have. As it turned out, Courtney did have both of the ones that came in the pack above. However, she didn't mind, because that gives her two to trade with her friends who have ones she doesn't! Win-win!

Thursday, October 27, 2016

Cell Phone Pouch

I made one last little thing out of Jess's new Holding Pattern barkcloth. It was very quick to sew, and I made it in a day. Jess had suggested making a cell phone pouch, and since we couldn't find a pattern that was quite what she had in mind, we made one up. She got the measurements from one she already had, made a prototype herself, and then sent me the dimensions. Here's how mine ended up. (And please don't ask for a tutorial. I don't do them. I'm lazy like that.)


It's not a snug fit for a phone. There's room for car keys, a chapstick, change, or whatever you want to take along for a quick trip 'out'. Exactly what Jess wanted.


Soooo.... below is what got shipped to Cloud9 to take to Quilt Market in Houston this week.


I have to give UPS credit. Cloud9 sent me a Next Day Air shipping label, and I dropped off the package at our local UPS after 5:00 p.m. on Monday. It was delivered to them in New Jersey before 9:00 a.m. the next morning! Amazing!
Wow - blog posts 3 days in a row for me. That's kind of amazing, too, isn't it?! Do I get some kind of a prize??? :)

Wednesday, October 26, 2016

Heidi Foldover Clutch & Wristlet

Here's another bag that is on its way to Quilt Market. Before I got the batch of fabrics I showed you yesterday, Cloud9 had sent three smaller samples they had of Jess's new Holding Pattern barkcloth, so I actually made this before I made the Harriet tote. This is also a Swoon pattern, the Heidi Foldover Clutch & Wristlet. It's a free pattern, in case any of you want to give it a try!


The flap has a zipper closure and a magnetic snap to hold it down.


There is a zippered pocket on the back...


... but unfortunately, I somehow managed to mess up when following the instructions, and the pocket is sewn shut, which I didn't notice until the bag was all finished. Grrr!! (Actually, it's "haha" by now. Better to laugh at yourself than growl, right?) I thought I was following the instructions correctly, but when using patterns with diagrams - as this one was - it's harder to tell what's going on. I much prefer patterns with actual photos of the sewing process. I'm still not sure exactly where I went wrong, but I'd better figure it out, because I have another one cut out!

Next up (tomorrow?)... one more project for Quilt Market!

Tuesday, October 25, 2016

Harriet Expandable Tote

What do you do when you get a gorgeous pile of fabrics like this...


... shipped to your door? They are samples of Jess's newest barkcloth collection, called Holding Pattern. Cloud9 Fabrics shipped them to me to make sample items for them to take to Quilt Market in Houston the end of this week. I received them last Monday, and of course I sewed... which explains my extra-long absence from the blog.

Here is one of the items I made. Jess and I were gifted the pattern for the Harriet Expandable Tote from Alicia Miller (thanks, Alicia!) of Swoon Patterns, and this is the result.


Although I wouldn't recommend it for beginners, it was a great pattern with lots of details and easy-to-follow instructions. In my usual style, I made it a little more complicated by insisting on matching the print. See how my pieces line up? It wasn't as hard as it looks, and once I had the first side piece cut, the rest were a piece of cake, since I'd cut both main pieces identically.


Also making the bag more challenging was the use of pleather. Jess bought some wonderful yardages from Discounted Designer Fabrics (she ordered one day and I received them the next!), and the one she chose for this bag even has some real leather in it. It is thick and cushy, yet sews through easily. I made the handles first, using my favorite tutorial by Emmaline Bags, because there are no raw edges when completed.


Here are some more progress photos. The tote has zippered expandable sides.


Of course with all that pleather, I was again most appreciative of my Wonder Clips, in both sizes.


I tried something new this time. I've used foam stabilizer before, but this time I tried Pellon's fusible foam. I thought barkcloth would be a good test fabric for it, since if it didn't adhere well and got ripply, the texture of the barkcloth would hide it. I was quite pleased with how it worked out. It seemed to fuse well, and if it's come loose anywhere, I can't tell it. (I need to experiment with it on quilting cotton sometime, because I've heard conflicting reports about it.) I trimmed off all the seam allowances before fusing, so there was no problem when sewing. It makes for a nice sturdy bag.

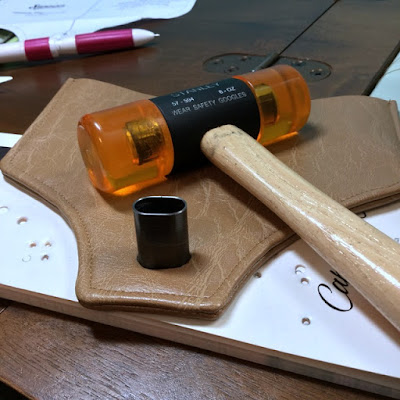
I tried something else new, too. I'd installed a twist lock closure before but found cutting the hole just right to be challenging. I happened to come across a set of punches of various sizes and shapes on Amazon, so I bought a set. Here's the punch I used. It wasn't exactly the right shape, but the initial cut was made easily with it and then I only had to trim tiny bits away with a scissors.


In case you're wondering... no, I did not wear safety "googles". But I didn't lose an eye or anything, either.

Harriet has a zippered pocket inside, and the zipper installed successfully.


After it was all made, of course came the photo session. I had lots of "help". Jasper was the worst. He's a little too loving... and curious. But he can serve as a size reference, since he refused to take a pic of me holding the bag.
 

Harriet is a very roomy bag, especially when the expandable sides are unzipped.


This next photo was taken indoors without Jasper's help, and it shows Harriet with her sides expanded.


Just for fun, here's a close-up of that matched seam and the topstitching to the right of it.


I enjoyed making this bag, even though I was feeling some (well, a lot of) pressure to get it done on time (I shipped it to Cloud9 yesterday). It was a lot of work, as I counted 47 pieces by the time I had it all cut out, and the pleather made it feel like I was wrangling a lot, but it was all worth it in the end. I think I'd make another, although I'd be inclined to use fabric trim instead of pleather, just to make it a little easier.

BUT... that's not all I made from that beautiful fabric! There are two more projects, so come back soon (hopefully tomorrow) to see the next one!


Monday, October 3, 2016

Gerbera Mini Crossbody Bag #2

Well, where were we? Or maybe the question should be, "Where have I been?" I've been here, sewing (among other things). If you recall from my last post, Jess and I had made plans for three bags. I've now made two of them. Here's what went into the second one, including a change of plans for the strap fabric, which became the somewhat wrinkled stuff on the bottom/right of the pile. I happened to think that a strap out of the light-colored barkcloth would show the dirt awfully fast, so I suggested substituting this. It had actually been part of a pair of drapes at one time. Upcycling is good, yes?


I adjusted my pattern pieces according to what I'd learned the first time around, and everything fit together the way it was intended to. I also used a technique [learned from Erin Erickson(Gilbey)'s patterns] for getting the corners at the ends of the zipper to turn out nicer, and that helped a lot. So everything went much better this time. I was so pleased with how my zippers turned out, in fact, that I had to stop and take photos of them. Ha.


Sooo... here's my second Gerbera Mini Crossbody Bag (from the free pattern found here).


See those nice corners? Yay!

This time I also used the band pleather for the zipper tabs, the D-ring tabs...


... and for the gusset, for a fun change. Incidentally, for this bag I made the gusset in a single long piece instead of the seamed gusset that the pattern called for. Seaming is best for directional prints, but I didn't need that for either the outside or the lining this time, and an unseamed gusset is stronger.


The lining and inside zippered pocket are from the brownish fabric in the top photo.


I'm still liking my little labels... and most of the time I remember to put them in, although sometimes not until it's almost too late. (They glue well, too. Ha.)


I tried something new this time. Awhile back I'd heard about Chicago Screws, and I bought some. They are like rivets only they screw together. Because this strap fabric was so thick, my other rivets seemed too small, and it would've been very difficult to get two lined up straight together. So I went with these, and I'm glad I did. You punch a hole, the same as for other rivets, and then you screw the two pieces together instead of pounding. My only concern is that they might unscrew over time, so I have some Loctite on the way. These are a nice alternative, but I think I like regular rivets better just because you don't have the visible screw slot on one side. No biggie, though, I guess.

(Just FYI, if you consider purchasing the Chicago Screws I linked to above, be aware that even though the description says 1/4", they actually measure slightly more than 3/8".)


The fabric was so thick that I had to make the strap non-adjustable because it wouldn't fit through a slider, plus I couldn't even fold it under decently at the ends, so I didn't tuck the end under and instead just zigzagged the raw edges twice, and I like how that turned out.

Here are the two bags, from Jess's In Theory and Time Warp barkcloth collections for Cloud9 Fabrics.


For details on the needed pattern adjustments, see my first here.

I took the photos in the living room because there was so much good natural light coming in the windows today. Josie and Annabelle were delighted to watch and very eager to help, but by the time I got done, this is what the scene looked like. Poor things - I guess I worked them too hard.