Monday, December 2, 2019

Little bright projects

What a gloomy year it's been, for the most part. So much cloudiness and so much precipitation. Fall was no exception. In fact, I feel like we got cheated out of fall altogether, and since it's my favorite time of year, that's pretty sad. I got tired of the dark dreary days lately and decided it was time for some bright, colorful sewing projects.

Months ago, I received some fabric samples from one of Jess's good friends who is from Japan. (She's the one, in fact, whose baby I sewed the tiny cowboy boots for.) The fabrics were so beautiful, and I wanted to make something special from them. Whatever I made had to be little, because the pieces were about 10" square. The gloomy weather finally inspired me to get going and sew some of them up, and here's what I made:


If you've been following me long, you'll probably recognize the Triple-Zip Pouch from the tutorial by Debbie Jeske. This is actually the 10th one I've made! (See the others here.) Yes, I love them, and they're so quick and fun to make. And isn't that fabric simply gorgeous? Fortunately the print went all directions, because I had to cut the two top pieces the opposite direction from the main piece in order to make it work. I think I have maybe a half-inch strip left. LOL


Here's more of the beauty on the back side. The photos don't even do it justice. The gold is kind of glittery. I was a little leery about ironing it, but it wasn't a problem at all.


I plan to use it to hold things I'd transfer from one purse to another, to make the switch easier. Since I make a lot of bags (huge understatement there), I do occasionally switch which one I carry, just for fun. The bad part of switching is always transferring all the little stuff, and this pouch will make it a breeze.


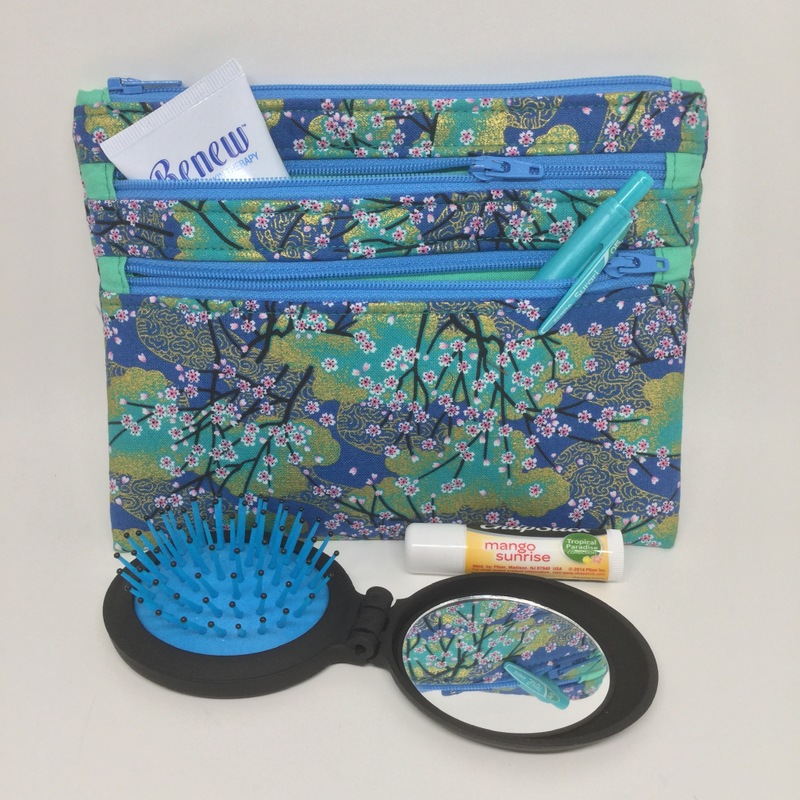
Just in case you wondered, that bottom item in the photo above is a fold-up brush. The bristles push down inside, and it folds up like a compact. I got it from Courtney for Christmas last year, and I love it!

The other item I made is something useful that I've needed for a long time. Can you guess what it is?


It's folded, like this:


It's a postage stamp holder!


I've made a couple of them before to use as sticker holders. They're very easy to make, and you can see a little tutorial here. I don't use a lot of stamps these days, but what I do have had been stored in a very raggedy envelope that the post office used to put your purchased stamps in... many years ago. It most definitely needed replacing. So now I have this beautiful little stamp holder from lovely Japanese fabrics - yay! I laminated the fabric with Heat 'n Bond iron-on vinyl, and I used a KAMsnap for closure. Perfect! And now I will think of Jess's friend Megumi every time I use the stamp holder or pouch.

I still have a couple of the fabric samples, so if you know of any cute little projects I could make from them, I'm up for suggestions!

Friday, November 15, 2019

Cleanup Clutch

Yep, I'm still alive. Nope, the blog hasn't died. It's not that I don't have things to sew... I guess I just took a sewing hiatus! I didn't touch my sewing machine for over a month! It felt kinda good for a change. I did other stuff, like clean out some drawers (fun - ha), did some other cleaning, read a lot, played some word games on my iPad. Just things other than sewing.

But I was beginning to have some withdrawals, so I was glad when Linds Handmade Designs called out for pattern testers again. Since I'd already made her Dayna Pack and tested her Twofer Tote, I knew this new pattern would be a good one, too. 

Here is her latest - the Cleanup Clutch. Front:


Back:


Under the flap:


The pattern calls for magnetic snaps, but I decided to use KAMsnaps, just for fun and some color.


The pattern also suggests adding a couple of rivets to hold the flap seam securely, and I did that. Hey, rivets don't intimidate me quite as much as they used to (about time)!


Here's what it looks like opened fully. It has two large slip pockets, a zippered pocket, and two smaller slip pockets to hold a flat package of wipes. It's actually designed to be a diaper clutch... for those quick trips when you don't want to drag a big 2-ton diaper bag along. The pattern includes instructions for a laminated changing mat, which I didn't make this time, for lack of laminated fabric. But it would fold up nicely and fit into one of the slip pockets perfectly.


It's a great clutch and would be handy for a lot of things. This one might get used in the car to hold hand sanitizer, Kleenex, and/or whatever. It folds up compactly.


It's a generously sized clutch - 10"w x 7"h x 1"d.


Just for fun, here's a collage I made of my pics, which appears in Linds's shop.


The fabrics I used are from a canvas line designed by Jess (a.k.a. How About Orange) a few years ago. I'm scrapbusting. Boy, do I have a long way to go! LOL

The pattern for the Cleanup Clutch can be purchased here. It's a great pattern and is easy to sew (and you don't HAVE to use rivets if they intimidate you - ha!). I think it'd be perfect for baby gifts if you don't have a baby yourself. It's at a discounted price (along with everything else in her shop!) for the rest of this weekend, so if you have an inkling to buy it, the time is now!

Tuesday, October 1, 2019

Shoreline Shoulder Bag - BOTMC

Have you heard of the Bag of the Month Club? It's a 3-month subscription where you pay one fee and get a new only-available-to-club-members pattern each of those months. The patterns remain a secret until the month they are released, so you don't know what you're getting when you subscribe, but they are designed by some of the best bag designers out there, so you can be sure you're getting great patterns and at a reduced price compared to buying them individually. You can subscribe anytime during the three months, so if you want to wait until you've seen all three patterns, you can do so and still get a good deal. A few months after that three-month period is up, each pattern will be released for sale individually, but the cost will be increased to regular pattern prices.

October is the second month of the current subscription, and the designer happens to be my favorite, Erin Erickson Gilbey from Dog Under My Desk. Have you heard me mention her before? ;) I was fortunate to be able to test her pattern (as I have many previously), and now I can finally show it to you! It's called the Shoreline Shoulder Bag. Here's my tester version.


The "birds" fabric is one of Jess's (a.k.a. How About Orange) Holding Pattern barkcloth designs for Cloud9 Fabrics. The solid navy is a canvas.

The front of the bag has a zippered pocket with a slip pocket behind it. The back side has just the contrast fabric with no pockets.


It's a good sized bag, as you can tell compared to the chair (sorry, there was no photographer available to get a shot of me wearing it). It's also wide at the bottom, so it holds a LOT of stuff!


The pleats help it to expand and hold even more!


The inside (on which I used a brushed denim lining) has the same pockets as the outside, installed the same way. Very easy to do.


Since my fabrics were rather heavy, I used a quilter's weight solid lining for the pockets to keep from getting too much bulk in the seams.

Erin has a unique way of attaching her straps, which she's used on a couple of her other patterns. I love how they turn out!


This pattern was great for fussy cutting the fabric for the front. It was pretty easy to do.See how that looks almost like it's a solid piece of fabric above the zipper?


One more photo, just because I love it and couldn't not use it. :)


So that's the October Bag of the Month Club pattern. I have to say, Erin's done it again, with another terrific pattern! It's extremely well-written, with lots of attention to detail and many photos to demonstrate the instructions. It's also been thoroughly tested, and you can see more of the testers' bags on Erin's blog post here. You can never go wrong with a Dog Under My Desk pattern!

September's pattern has been available through the club for a month, and you can still get it if you subscribe before the end of November... or wait until the subscription is over after November and buy it individually. You can check out the details here.

Monday, September 9, 2019

Twofer Tote

As I mentioned in my last post, I had another pattern test coming up. This was for a new designer I'd never tested for before, but I had sewn one of her other bags recently. The test is now completed, and it went very well. I'd gladly test for her again. Here's the resulting bag:


It's the Twofer Tote, by Linds Handmade Designs, and it can be purchased here.

It has shoulder straps plus a crossbody strap, and when carried as a crossbody, it folds over for a different look.


The pattern features leather accents, but cork or faux leather (as mine is) can also be used, and I learned some good tips for sewing with leather. It even has an accent piece around the zipper pocket inside, and I love the look of it. It's so easy to do, and the inside of the pocket has no raw edges, not even the zipper tape.


There are lots of rivets in this bag... 20, to be exact! Although if you're intimidated by rivets, you could skip them and just stitch instead, but I really like the look, even of those on the inside of the bag, They just add 'something', don't you think?

The fabric I used on the outside is some of Jess's (a.k.a. howaboutorange) barkcloth that she designed a few years ago for Cloud9 Fabrics. (Unfortunately it's all sold out now, so don't even ask.) I still love the texture of it.


So there you have it... a sweet tote bag with a zippered top, three slip pockets on the outside, one accented zipper pocket inside, shoulder straps plus a crossbody strap. I love it, and the pattern was easy to sew (some bag-making experience is helpful but not required), well thought-out and detailed, yet not complicated or confusing. I highly recommend it!


Grandpa happened to come home just as I'd finished taking photos, so I enlisted his help for one more, so you can get a feel for the size of the tote. It's just right, I think.


Speaking of taking photos, the background makes all the difference! Here's one that I took on the deck steps. It sure looks blah compared to the ones in front of the flowers, doesn't it?


What's next? Maybe another pattern test. The tester call hasn't come yet. Other than that, there are still plenty of to-sew's on my list, so we'll see.

Thursday, August 22, 2019

Classic Shirt #2

What would you make if you received fabric like this in the mail?


Can you guess who picked it out? No, not Courtney, but if you said Jess, you were correct. She fell in love with it when she saw it at Oak Fabrics, and she asked if I might "pretty please" be interested in making her another Classic Shirt, using the same pattern I'd used before by Liesl + Co. I figured 'why not?' since I was all practiced up from making the other one.

She suggested one change, and that was to make the collar just a tad wider. That was an easy adjustment, and I added ½" to the width. I also used the old traditional way of sewing on the collar and cuffs, rather than the more complicated (or at least it seemed so to me) way the pattern called for. I found it easier, and I think it turned out just as well if not better. Also, this rayon was a bit easier to work with than what I used for the first shirt, so that was nice.

Behold the Classic Shirt, in Broken Staircase rayon!


Her photographer (hubby Alex) was out of town, so she just sent me these quick in-front-of-mirror iPhone photos.


It must've been a bad hair day or something. ;)


So, another successful shirt in the books. One more to go... my own! Someday. Don't hold your breath. I have a pattern test coming up soon, so that will be first.

Saturday, August 10, 2019

Sewing with Courtney - another year, another 4-H garment

*UPDATE: See end of post.

Another year has flown by and it's nearly County Fair time again! Granddaughter Courtney wanted to sew another garment, so a little searching came up with this pattern, and she loved it immediately.


Since we got off to a much later start than last year, there was no time to waste, and she got busy and cut it all out in one session.

I kinda like that "flamingo pose", don't you?

The next time she was here, she began sewing it together.


It's chilly in my basement sewing room, so a sweatshirt was usually required. I don't think the hood was 'necessary', but... ;)


She kept her iPod nearby, just in case she got a friend alert or something. Or if they tried to call her, just to "start a conversation". LOL


Here is her romper, half done, and a better look at the fabric she chose. I admit I cringed a little bit when I saw it was a plaid, but there wasn't a terrible lot of matching to do, so we conquered it okay.


She got to learn something new this time - how to sew with a serger. She used it to finish the seams. She's not really sewing with it in the photo below, but faking it because I forgot to take a pic while she was actually doing it.


She carefully did the ironing herself, including measuring and pressing up the hems. Below she's working on the shorts hems, but she also did all the way around the top and bottom edges of that ruffle! She got lots of practice!

Speaking of that ruffle, I learned a new tip a while back for making narrow hems easier, especially on curved items. You serge the edge first, before pressing, so then you have that ¼" of serging stitches to go by when folding. It works like a charm, and it helps to draw in the excess fabric in the curves so that you don't get a bunch of little pleats.


More sewing below, plus folding and pinning the tiny narrow tie for the waist bow.


I did allow her a break occasionally, which she spent with a snack, and....


Ta Da! The finished romper! It fit just right and we were both so pleased with how it turned out!


Here's a little closer look below. On examining this photo myself, I finally realized how lucky we were in how the plaid matched up vertically! I really couldn't plan for that very well when we laid it out because of the gathering and the seamed shorts, but somehow it worked out just right! I love when that happens!!


We had a fluffy little photo assistant (well, several of them actually), so how could we not include her in one of the shots?


The 4-H Fashion Revue was held last Tuesday evening. Here she is, modeling her constructed project.


This is her purchased outfit.


Finally, here's her recycled outfit.


At the end, they did a little "parade" of all the fashions. There was quite a variety, and it was fun to see all the garments.


We don't know exactly how she did as far as scoring. We'll find out next week when all of her projects are put on display at the fair with their respective ribbons. She's been working on many projects besides this sewing one. I'm sure she'll do well and that her dream of going to the State Fair with one or more will come true! She does an excellent job on everything, and I am so very proud of her!

*UPDATE:  Courtney was happy to report she got a Reserve Champion and a purple ribbon for her romper. Way to sew, Miss C! She also received 5 Grand Champions and various other awards for her many other projects, and she's earned herself a trip to the State Fair, which I know she is looking forward to a lot.