Saturday, June 29, 2019

Benjamin Dopp Kit

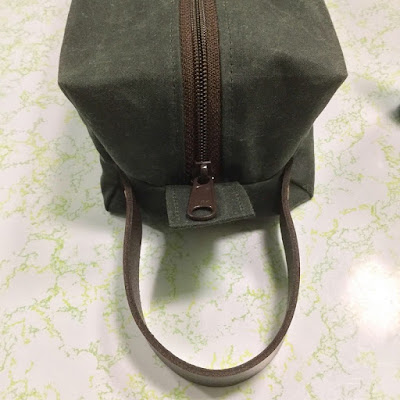
I love quick, easy projects that use up scraps. This time I almost finished up my last bits of waxed canvas (same as I used for the Dayna Pack in my last post). I still have about a 10" square piece left for 'something'. It's so nice to sew with, and I just may have to get some more sometime.

I made a Benjamin Dopp Kit. It's from a free tutorial by Red Rabbit Mercantile, and it can be found here. It makes a nice little masculine shaving kit or possibly a cosmetic bag in prettier colors. This one was for Grandpa, and it's made its first trip already - to Texas!


I added a strap that was also left over from a previous project, and then I added purse feet... mainly just for fun, because I could. :)


I used some ripstop nylon for the lining but failed to take a picture of it. Imagine it black. :)


So there ya have it. Done in a day! Yay!

Monday, June 17, 2019

The Dayna Pack

After that last pattern test that turned out to involve much more time and work than I'd anticipated, I needed something quick and fun to sew. Last summer I made a hip pouch to carry some supplies along when I go to feed my outside cats. It has turned out to be not quite big enough, so when I saw this Dayna Pack, I was tempted to give it a try. A recent sale convinced me, and I bought the pattern

It was indeed quick and fun to sew! I love how it turned out. Here is my Dayna Pack (fanny pack/hip pouch).


The solid fabric is waxed canvas that I had left over from another project. The kitty fabrics for the outside and lining (below) were gifted to me by a friend several years ago.


Both fabrics are out of print, but in case you're interested, I did see some of the newsprint available in some Etsy shops. It's called Kitty Chronicles by Timeless Treasures. I don't know what the cats in trees fabric is - sorry.

Y'know, it's really hard to get a selfie to give you some size reference. My arms aren't long enough! But here's the best I could do.


You may have noticed down in the bottom of the pic that I had an assistant. Actually, I had two of them, and because they are just so darned helpful cute, I'll show you both of them.


I found it kind of funny that when I wrote the post about last year's pouch, I also had a feline assistant. She's their older sister. I guess photography runs in their family. ;-D

Here's one more shot I tried, in front of my dirty living room windows. It may be my favorite. Haha! But it does give a better size reference.


Fanny packs are back 'in', you know. So if you want a fun, easy sewing project, get the pattern from Linds Handmade Designs. They also have some completed Dayna Packs listed (in case you want one but don't sew), plus some other top-quality handmade items. Check 'em out!

Thursday, June 6, 2019

Enya Wallet

I was asked by a new-to-me designer, Damjana of Apple Green Cottage, if I'd be willing to test her newest pattern, the Enya Wallet. I'm always interested in new patterns, and it looked simple enough, so I said yes, even though the test ran over the Memorial Day weekend which meant, since Jess and Alex would be here, I'd be getting a late start.

The wallet turned out to be much more than I'd anticipated from just seeing the initial photo of it! It's filled with pockets, both zipper pockets and slip pockets, plus 8 card slots. So the pattern had a lot more to it than I'd expected, too. In fact, it has 101 steps. That said, I made it, although I didn't complete it before the testing period was over. But I DID complete it just yesterday.

I only thought to take one progress photo along the way. These are the two zipper pockets. I did add a facing, which the pattern didn't call for, just because I like the completely finished inside of the pocket, plus I like that the lining fabric doesn't show around the edge of the zipper on the outside.


Here's my completed Enya Wallet... front:


... pocket under the flap with magnetic snap for security:


... back with zipper pocket:


... which has the hot pink lining:


... inner zipper pocket, with lining matching the flap (and my tag which is glued on because I didn't think of it till the project was all done - AGAIN!):


... and the card slots with two slip pockets behind them:


The pattern is very clever in how all those features come together. It makes for a very sturdy little pouch. Although the pattern is supposed to be beginner-friendly, I think I'd find it intimidating if I were a beginner. But if you're ambitious and patient, you can end up with a very cute little wallet that can be carried with a strap, or without the removeable strap as a clutch. I love how mine turned out, and I hope Courtney does, too, because I made it intending it for her and her ever-present iPod. ;)