Showing posts with label leather. Show all posts

Tuesday, May 14, 2024

Leather Double Zipper Waist Bag

WARNING: Long post and lots of photos! But this is something new… for me, at least. So I want to include all the details.

Last Christmas, Jess and Alex gifted me with some real leather for bag making! Look!


Isn’t it beautiful? I love the colors! The green has a bit of a teal tint to it… right up my alley. It’s pretty firm, but no problem for my Sailrite machine to handle. The fuchsia (wow, I can never remember how to spell that word!) piece is much thinner and nicely drapey.

So I’ve had my eye out for patterns for something special to sew with either one of them. Looking through Etsy one day, I came across a pattern for a really cute waist bag that I thought would look great made out of the green leather. Best of all, it was on sale for only $3.25! I figured I couldn’t go wrong at that price, even if the pattern wasn’t so great, so I bought it.

Much to my surprise, I discovered that the pattern was meant for HAND sewing leather! And the way it was put together, it couldn’t be sewn on a machine. Hmm. I did a little researching into the process and decided I’d give it a try, just for something fun and new to do. It turns out I had quite a bit of learning to do, but thankfully there are lots of YouTube videos showing how it’s done. I watched quite a few of them.

Also, that inexpensive pattern turned out to be ONLY the pattern pieces. The instructions were given on another YouTube video. It had no words, just demonstrations of how-to. However, it was very clear and easy to follow.

The pattern pieces had marks for every stitch hole that needed to be punched. That seemed like it would be a very tedious process, so instead I ended up getting a set of these punches, so I could punch up to four holes at a time. From the videos I watched, it seemed like most people used these punches, anyway.


There was a “slight” problem with using them, though. Although they worked really well, they were 4mm apart, where the pattern marks were 5mm apart. That meant I had to be extra careful when punching so that my holes lined up right with their corresponding holes on the adjoining piece. The trickiest part was on the gusset, because it had to go around curves, and each side of the gusset attached to a different piece (front/back). I got the one side sewn on, which turned out to be a stitch off when fitting to the front. I then needed it to also be one stitch off on the other side so it would fit the back the same way. I actually counted the number of stitches on both pieces just to make sure! Fortunately they came out the same. And the ‘off’ stitches made the gusset a stitch too long, which was no problem. If it had been too short, I don’t know what I’d have done!

Besides those stitch holes, I had other holes to make. Thankfully I’d bought a set of lots of different shapes of punches a couple years or so ago, and I had just what I needed. Here’s one of them, and the crisp, clean hole it made in my belt:


With all the raw edges of leather that would be visible, I needed to finish them somehow. I considered edge painting them black, but the inner color was such a pretty teal. I decided to just seal them with several coats of clear edge finish and let that teal show through.


My stove made a good place to lay the pieces as their edges dried.


The inside of the leather seemed kind of “fuzzy”, and I could’ve just left it raw, but I decided to try that edge coating on all the insides, too. It went on quickly and easily, just spreading it with my finger, and I was pleased with how it turned out. It sealed down the fuzziness and made it much smoother.


The first part of the actual sewing was also the hardest - stitching the zipper in place. My holes looked a little messy around the curves, but that got covered up by the thread. The hard part was sewing through the zipper tape. It didn’t work to punch holes, so I had to push a blunt needle (hand sewing leather needles are intentionally blunt) through that tape. It was a workout for these old hands!


I did it! They weren’t perfect stitches, but I was okay with them, considering it was my first-ever hand sewing job.


Then I sewed that pocket onto the front of the bag. That was kind of a breeze compared to doing the zipper. Alas, then I remembered I had a second, even longer, zipper to sew into the gusset! Yes, it was just as much of a challenge. But again, I made it. Needless to say, the zippers took a long time.


If you know nothing about hand sewing leather, as I did, I’ll just briefly say that you use one long piece of thread with a needled knotted onto each end, then you go back and forth through the holes, switching needles back and forth. I enjoyed it, once I finished the zippers. It’s pretty slow going (like a good pace for me was 2 stitches per minute), but it’s rather relaxing.


I had to be careful attaching my D-ring tabs to the back. They are two layers, and the holes of course had to match with holes on the back piece. So I glued the tabs together, punched the holes in them, then lined them up and held them on with double sided tape so they couldn’t slide, and punched through their holes and through the back piece. It wasn’t as bad as I thought it was going to be!


So here’s the finished bag, the Leather Double Zipper Waist Bag.


It has a belt to hold it on your waist.


Here’s how it looks on me:


After finishing it, I thought the zipper pulls need something to make them a little easier to grab ahold of. None of the little leather pulls I had on hand seemed right, but I used them as inspiration to make my own out of matching leather.


The rivets I used to hold them together were some rhinestone ones I had recently gotten (on a whim, to bring my order total high enough to get free shipping). They were perfect!

My bag is far from perfect, but I’m still very pleased with it. I’d very happily hand sew another bag sometime, as I really enjoyed learning something new and going through the process. Of course that process was a slow one, taking a couple of months or so. But that’s the beauty of being retired… I can take as long as I want!

Besides the punch set, I also had to purchase some waxed thread to sew with and of course the hand sewing needles. Everything else I had on hand, so not much extra expense. Oh, and the $3.25 pattern! It’s still on sale until May 24th (but at $3.85 now… still a great price), and it can be found here. He has lots of other bag patterns that tempt me, too! Someday…….


Monday, July 20, 2020

Pocket Pal #2

In my last post, I mentioned that I had one more item that I’d sewn but was waiting until it was received before I would post it so as to not spoil a surprise. That’s finally happened, and here it is:
                           

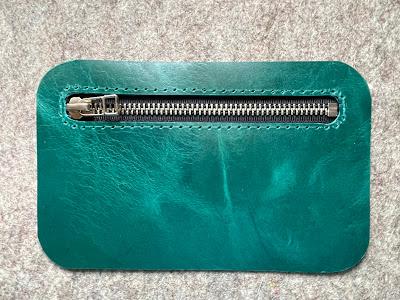
Look familiar? Yep, it’s another Pocket Pal like this one, only it’s made from a different leather. I’ll show you the surprise in a minute. You can refer to my other post for details, but I thought I’d show you some progress photos. The leather I used is another from the box of scraps we got from Amazon. It’s really nice and soft, and easy to sew. Here it is, ready to have the zipper stitched in. Also note there is a slight difference in that I rounded the corners, as requested by its recipient. Doing so made it just a bit more challenging, but not terribly much.


This leather was a bit stickier to sew than the other one, so I tried out a tip I’d read online somewhere a while back. It was to put some kind of powder on it to keep it from sticking to the presser foot and plate. It worked like a charm. It didn’t take much... I just dipped my fingers in it (I used cornstarch) and rubbed them on the leather. As you can see below, it only took a tiny bit so it wasn’t really messy, and it was easy to wipe off afterwards. I used a soft napkin just because it was handy, but a microfiber cloth would work great.


Here’s the lining after it was applied. Kinda cute, huh?


It becomes a very slim wallet that easily fits in either a front or back pants pocket.


So here’s the surprise for the recipient, who just happens to be Jess. She loves kitties, and I thought it would be fun to have one peeking out at her when she opened the coin pocket. She loved it! She also loves books, so the fabric was perfect for her.


I remembered to add my label, too, and didn’t even have to glue it in this time. :)


So here you have it...


... and here you can compare it with the first one I made.


That’s it... I’m all caught up posting everything I’ve sewn. However, I have two garments and at least one pattern test coming up this week. Time to get the sewing machine in gear again!

Monday, June 15, 2020

Pocket Pal

Once again I’ve tested a new pattern for Linds Handmade Designs. This one was quick and easy to sew. It was designed for leather, faux leather, cork, or vinyl, so there are no seams to finish... yet it’s fully lined. 

A couple of years ago or so, Jess bought a box of real leather scraps from Amazon. We intended to use them as accent pieces on a bag or something, but never came up with the right project for them. This little wallet turned out to be the perfect project, and the whole thing is made from just a small piece (plus cotton fabric for lining). So it’s a great scrap buster, besides being a very handy pocket-size wallet. It’s called the Pocket Pal, and here is my tester version:


I had never sewn with real leather before, so this was an experiment for me. It went very well - I had no problems sewing it at all. I did, however, have trouble photographing it - ha! I took the pic above with my DSLR camera, and it’s the only one that shows the true burgundy color of the leather. The rest are iPad pics, and it was determined to make the color brown. Oh, well.

There are three card slots and a zipper pocket for cash. The handy flap closure fastens with a snap to keep your cards secure. I used a spring snap, but KAMsnaps work well, too.


The pattern calls for a strip of 2-1/2“ ribbon to line the card slots, but cotton fabric works well, too, which is what I used. I cut it slightly wider and pinked the edges, but that probably wasn’t necessary because the edges are glued to the lining, so not really any chance of frayage or slipping.


It’s a very slim little wallet...


... and fits perfectly in your pocket.


I got in some more practice using edge coat, which I had done previously on the Slim Sling. It’s easy and rather fun to do.

I love this pattern! In fact, I may have already started a second Pocket Pal. I’ll show you that later. If you’re interested in making one, the pattern can be found here. I think the price is a great deal, because it includes SVG files that you can use if you have a cutting machine, and as always with her patterns, Linds has made a how-to video.

What to sew next? I guess I should finish up some masks that I’ve started. Have you made any? Maybe more importantly, do you wear them? 

Monday, January 23, 2017

New lighting... and some peeking

As some of you know, my sewing room is in the basement. The lighting is not the best, especially for sewing on something dark... especially at night. I wanted to brighten things up a bit, so I considered getting one of those LED strip lighting sets made for sewing machines. (I'd kept trying to win one every time SewCanShe had one in their giveaway, but that never happened. I was delighted, however, when my friend and faithful commenter, Annie Dee, recently DID win one! Yay!) 

I went to Amazon.com to look for a lighting strip, and in doing so, I found one of these which I purchased instead. It's an LED light on a flexible goose neck that has a magnetic base. I love it! I can adjust it to wherever I need it the most (or could even take it to another room for a different project if I wanted to). Very bright and helpful. 


(Side note: Apparently my sewing machine is not magnetic, which totally surprised me, so I had to rig up an alternative way to attach it. It was easy and worked very well, so if anyone wants to know how I did it, tell me in the comments and I'll do a separate post about that.)

A couple of weeks ago I got to thinking about how long my sewing machine light bulb has been in use (years), and I decided I should buy a new one to have on hand. I went back to Amazon (who doesn't shop on Amazon?!) to look for one, and much to my surprise and delight, I found LED sewing machine bulbs! So I bought this one.


It makes a world of difference! Here's a shot of the old incandescent bulb's brightness (or lack thereof)...


... and below is the brightness of the LED bulb.


To compare more easily, here they are side-by-side (LED on the right), with color comparison of a piece of fabric below them.


Quite a difference, eh? I thought some of you that sew might appreciate knowing about the availability of the LED bulbs. Some newer sewing machines come with them, so you'll have to check yours. But if you have an older machine, you might want to invest in one. They cost more, of course, but they should outlive the incandescent bulbs many times over, plus the extra brightness is well worth it!

There are two different kinds of sewing machine bulbs - a screw-in and a push-in, so be sure to check your bulb type before ordering. Mine above is the push-in type. I was also given the tip that you should handle the bulb by the base, especially with the push-in type, because they push in kind of hard, and handling it by the bulb itself might cause it to break.

On another note... a few weeks ago, Jess ordered something fun - a box of leather scraps to use for trim pieces on bags, etc. It was a nice assortment of colors and sizes, and the quality was great. Inspector Josie approved wholeheartedly. Annabelle seemed to appreciate the box more (which, as you can see, was again from Amazon - no, they are not paying me to advertise for them - ha!). You can expect to see leather-trimmed items in future posts.


Just to let you know I've not been sitting idly doing nothing, here's a sneak peek of my latest sewing completion, made from Jess's new Spring Quartet corduroy collection (which unfortunately has been pushed back for a July release instead of March, and the new Holding Pattern barkcloth will be released in March instead) for Cloud9 Fabrics.


I'll be showing you the rest soon. Jess should receive the package today and will be taking more photos for me.

I also have another project over half done, but it's on hold for the moment, pending a new zipper technique I'm waiting to learn about. I can't wait to get it finished, though, because I love it a lot! Hopefully I'll get to show you soon. Meanwhile, my mind is clicking away with all kinds of project ideas......