Monday, December 3, 2018

Triple Zip Pouch #9, and updates!

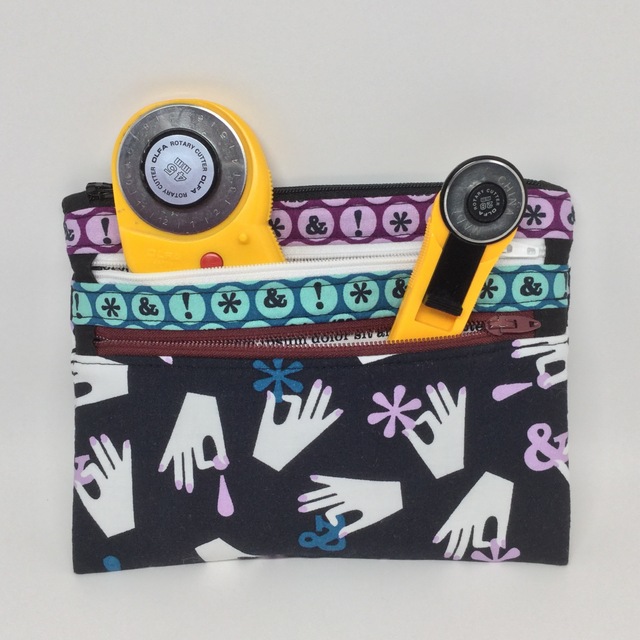
You might think I've lost it and am posting a rerun, but it's not so! This will look very familiar for a reason. Back in August I made a gift for a friend, and she likes it so much that she asked me if I would make one similar for a birthday gift for a special friend of hers! That was a great compliment to me, and how could I refuse? So here's my 9th Triple Zip Pouch, from the tutorial by Debbie Jeske. Again, the fabrics are from Jess's Typography line.


Here are the two together:


They just different enough so the gals won't get them mixed up if they happen to be together when using them.

I love this tutorial and always enjoy making these pouches. The end is like magic when you turn it right side out and the finished pouch appears!

They're the perfect size for rotary cutters, but they're useful for any number of other items... infinite possibilities!


An update on my wrist: It's been well cared for, as you can see below.


The cast came off two weeks ago today - hurray! Here's my scar, hiding the titanium plate and 9 pins.


The scar is much improved since that photo. I've been going to occupational therapy, but my therapist is on vacation this week, so I'm just doing the exercises at home. Flexibility and strength have improved a lot, but gosh darn it it gets stiff and sore sometimes. Writing and typing seem to be the worst culprits for making it sore. Ugh. So I'd better quit here soon. Oh, and BTW, with all the therapy appointments and home exercises, I haven't even had time to tackle any sewing projects. I'm not sure how the wrist will handle rotary cutting. I'm hoping my ergonomic Martelli cutters will go okay.

One more update before I quit... my kitchen floor is getting a new look! I've hated this linoleum for so long, and it finally started wearing out, after 40 years! This was a last shot that I took this morning. As of right now, it's been skim-coated and the new linoleum will go over the top of it tomorrow.


Woohoo!  I can't wait for it to be done!!

Thursday, November 1, 2018

AG Doll Go Everywhere Anorak Jacket

Yes! I sewed! Broken wrist and all. I was having withdrawals, so I just had to give it a try. It wasn't too bad... but pressing was a challenge. I won't be doing a lot of that for a while. Since typing on this keyboard is a challenge, too, I'm going to keep this short and sweet.

This is the Go Everywhere Anorak Jacket, and the pattern is from Pixie Faire. I had it about 90% done before my accident, so it didn't take long to finish it up. (Well, sorta... with a broken wrist, EVERYTHING takes a long time.)


It was easy to sew, and I love how it turned out. I made it from some brushed denim that I've had around here for probably 25+ years. Here are some progress pics.


Only the hood is lined. The inner seams are all finished with the serger.

Wonder clips were once again very useful.


I was so happy to get it finished, and I had just enough time to take advantage of the "golden hour" sunlight for photos. I knew the jacket would look good against the fall colors outside... but it was so windy that I had to prop Kit against the sedum to keep her from falling over. It worked, and I was very pleased with the photo quality.


So that's that. I'm itching to sew something else now (also itching inside my cast once in a while). I haven't tried rotary cutting yet, and I'm sure that'll present another challenge, but I have three different kinds of cutters, so surely one of them will work, right? I hope!

By the way, here's my "upgrade". Thankfully, it's much more streamlined, the best part of that being that it fits inside many of my sleeves, especially my winter coats!


Only about 2½ weeks to go........

Thursday, October 18, 2018

AG Doll Footie Jammies... and other stuff

I didn't think I'd be showing you this for a while (I'll tell you why in a bit), but I guess I can do it, so here goes....

I happened to come across another Pixie Faire pattern a while back that was so cute I couldn't resist. (Have you heard that here before?) It was the Footie Jammies pattern. Could you have passed this by?


The pattern calls for 4-way stretch fabric, and I happened to have some stretchy velour that I'd gotten in an online grab bag several years ago. I also had some ribbing from back in my T-shirt sewing days when my kids were little... like 35+ years ago(!), and they worked together nicely.


The stretchiness was necessary for the jammies to fit properly. It was a bit challenging in places, but it also was forgiving when it came to seam allowances. The biggest problem I had was the ends of the ribbing above the zipper. They're kinda wonky, but Kit doesn't care. ;) I'm still very pleased with how the jammies turned out.


Soooo... the reason I thought I might not be posting for a while... here it is...


Yup, that's me. And that's my right wrist inside all the padding and bandage. (Of course I'm right-handed.) I tumbled down the three steps in our garage and landed on the cement floor. All because of a cat. If you know cats at all, you know how they yowl if they even 'think' you're gonna step on them... and you automatically jump, right? Well, I jumped and missed the step and it was downhill from there. Though it could've been way worse, I did a pretty good job, anyway. The surgeon put in a plate and 9 pins!

That was on the evening of Oct. 8th. (Good timing, as it was rainy and Grandpa was home and not out harvesting.) By now I have pretty good use of my fingers, but as you can imagine, typing is slow. Incidentally, the brace thingy keeps bumping the home key and sending me into a panic when all my painstaking work disappears! Ha! Thank goodness Blogger automatically 'Saves' often! Anyway, I'm really looking forward to getting my stitches out and a regular (less bulky) cast on next Monday.

Living one-handed, left-handed, is pretty slow. It takes forever to do anything. But I get there, and I'm blessed to be having no pain.

To make life even more interesting, we got this on Sunday. Exactly 6 months to the day, after our horrendous April blizzard. NOT a welcome sight to see!


Fortunately, it started melting quickly and was all gone in a couple days.


Actually, today it topped 70°! I'll take it! Crazy weather, anyway.

Don't look for me back here anytime soon. Not only is it too hard to type, but I CAN'T SEW! :( Well, I might be able to sew a little, but I can't use the iron. So 'bye for another 5 weeks or so... till I can finish the really cute project I had almost done before this happened.

Wednesday, October 3, 2018

Strappy Baby Shoes

If you saw my post about the tiny cowboy boots, you may remember that I said I'd also made a tiny pair of shoes from the same pattern. They've been gifted now, so I can show you, and here they are!


Yes, very tiny! Even tinier than the cowboy boots, actually, since I made the smallest size. Yes, they were fiddly to make. Very fiddly. But not as bad as the boots! :)

I didn't take many progress pictures, but here are a couple.


The soles have a layer of fusible foam for cushioning (although I don't imagine they'll get walked in much - ha) and to help them hold their shape. There were definitely some tiny curves to sew.


I chose these because of the three shoe designs in the pattern, I figured these would be the most likely to stay on a baby's feet. The straps are fastened with KAMsnaps. That was the fun part of making them, because the snaps are so easy to install. The rest was total fiddliness... but the cuteness factor kept me going. Every now and then I'd hold them up and go "awww" and giggle a little. :)


The grandparents of the baby are very good friends of ours, and we occasionally get together with them for supper, so I knew they'd deliver the gift for us. I wanted to see their reaction to the shoes, so I needed to wrap them somehow so that the gift could be opened and inspected without harming the wrapping. ;) I decided to make a little boxy pouch that could be unzipped! I had enough of the shoe fabric left, so the box even matches the shoes.


I used a free pouch tutorial I found online. I don't even remember which one, but there are bazillions of them out there if you want to make something similar. I measured the shoes and adjusted the pouch pieces, and it turned out just right.


So there ya have it! I'm sure the shoes will be outgrown quickly, but they could be used for a decoration on a shelf in the baby's room or something, right? ;) They were just for fun, and I got my kicks, so mission accomplished all the way around. The shoe pattern was by Ellie Mae Designs (#K113) for the McCall Pattern Company.

Wednesday, September 26, 2018

Jack Tar bag

I'm happy to tell you that Jess (a.k.a. howaboutorange) has a new line of fabrics that has just been released! Once again, she created the designs for Cloud9 Fabrics, and here they are, called Business Class:

(Photos by Cloud9)

This time the fabric is a luscious, drapey rayon! So elegant! I love the description: 'Business Class is for ladies. Ladies who set up spreadsheets and change diapers and pay the rent. Ladies who like pretty blouses and suing for breach of contract. Ladies who are "fast, thorough, and sharp as a tack, who are touring the facilities and picking up slack," in the immortal words of Cake. Here's to women who are getting things done.'

Sooo... I'm a bag maker. I can sew garments and have made many, but I'm not so good at making them to fit someone who is not here to try them on. However, Jess has a good friend who can do just that - Rachel Epperson, owner of Oak Fabrics of Chicago. She offered to sew garments for Cloud9 as samples... and sew she did! She is one amazing lady, and you can see all of the MANY fabulous garments she made (modeled by Jess and another of her friends) if you check out the Instagram and/or Facebook accounts of Oak Fabrics, Cloud9 Fabrics and/or How About Orange. (I'll let you do your own searching... they're easy to find.)

So what does a bag lady do with rayon fabric? Actually, Rachel asked me if I wanted to help her out and make something for her. I gladly said yes, because I love being involved in the fabric release process. Here's what arrived in my mail.


The top half of the photo is, of course, the Senator print of the Business Class line. But check out that bottom half - it's oilskin! Interesting bag combination? YES! So I put them together and made a bag. Of course Rachel sent a pattern with the fabric, along with hardware and everything else I needed to make it. There was a real leather strap (which was longer than needed, so I had to research how to cut it properly... a rotary cutter did the job very nicely [do NOT use a scissors!]) and exactly 4 rivets. I've installed rivets before, but usually do a practice one, because sometimes I've messed up. Yup. But this time I couldn't afford to mess up because there were no extras and I didn't have that size in my stash. SUCCESS!! (Whew!)


Here's the completed bag, a Jack Tar bag, from the pattern by Merchant and Mills. It's BIG!


The pattern was great. It had short but easy-to-understand directions and illustrations. I'd never sewn on oilskin before, but it all went very smoothly, and I'd gladly use it again. Here's the outside; it has the leather shoulder strap plus oilskin handles.


The rayon (backed with a layer of fusible woven interfacing for stability) was used for the lining. There was also a magnetic snap for a closure.


It made a lovely lining, and there is a divided slip pocket inside also.


The oilskin is pretty cool. Of course there is no ironing to it, but it's supposed to have that wrinkled look. Finger pressing the seams worked nicely. I used a topstitching needle, and I had no trouble at all sewing through the layers.


As I said, it's a BIG bag! It has room for tons of stuff!


I recommend the pattern if you're in need of a bag that size. It was really easy to sew. Rachel has the pattern and all the supplies available in her Etsy shop or of course in her Oak Fabrics store in Chicago. She also carries the new Business Class rayon, of course, or you can go to Cloud9's "Where to Buy" section to find other retailers.

Friday, September 21, 2018

Tiny Cowboy Boots

Some months ago - April, actually - Jess showed me a super cute pattern of various tiny baby shoes that could be made from fabric. Her exact words were: "Look at the baby cowboy boots! I wish I liked sewing more or I'd make some for Megumi's baby. A gift from America. :)" Not a hint or anything. Nooooo. Ha.

My response was: "They are adorable! I know someone who does like to sew... little putzy things like that, even!"

So that's how I ended up making very tiny cowboy boots. And here they are!


It's a good thing I do like making putzy little things, because they certainly were that! First there was all the topstitching. It took some time and practicing so that all those stars would have a uniform shape and even stitch lengths to each point. But once I got one figured out, they went pretty smoothly. This was on a layer of chambray plus Pellon fusible foam.


Since I had no topstitching thread or local source to buy some, and I wanted things to show up better than with just a single strand of regular thread, I experimented with using two threads in my needle along with one in the bobbin. I thought I had read that somewhere... or maybe I made it up... I don't really remember. But the important thing is that it worked! Yay! Below are the tabs. The second from the left shows the single bobbin thread, and the other three are the double-thread topstitch.


The next challenge was sewing that toe piece onto the top. It doesn't look too bad just pinned there, right?


These are the shapes that had to be joined, though!


I used lots of Wonder Clips trying to hold that fleece down, because it really wasn't supposed to show.


But show it did... and actually I liked it better this way!


Using the fleece was what caused the biggest challenge. The pattern didn't require it, but let's go for the cuteness factor, right? It was thick and a bit stretchy, and of course it covered up the stitches and the fabric edges, so I was somewhat sewing blind. Ha!


That skinny little bottom band was tricky enough to sew on, not to mention with fleece...


... and I'd never have accomplished them without more Wonder Clips!


But I did it, with only minor puckers. Then came the soles...


... which nearly made me lose my sanity! ;)

The pattern called for cotton fabric for the bottom lining, but that didn't seem like it'd be as comfy, so I used fleece throughout. And don't they look cozy when all was said and done?!


Yes, very tiny.


My favorite photo assistant gives you another size perspective.


Before I made these, Jess and I talked of how cute they'd be in pleather. These were actually supposed to be just a prototype, but it's a good thing they were a wearable prototype, because there's no way I'd do them again in pleather! Hahahaha! Or maybe even with fabric. For sure not with the fleece. 'Maybe' with fleece fabric. Maybe not. But Megumi, if you ever read this, know that they were a labor of love! And your little guy is just about the cutest baby I've ever seen! When he grows into them, if you feel like sending me a photo I can post of him wearing them, I'd be delighted! But it's not required. ;)

The pattern I used was an Ellie Mae Designs (#K113) by the McCall Pattern Company. I may have since made another of the tiny shoes from the pattern. I'm still sane. Barely! ;) But they were fun, and soooo cute, too! You'll see them later. They haven't been gifted yet.