Tuesday, February 15, 2022

The LindSling

Hmm... I started this post almost 2 weeks ago. I guess I should finish it, huh? Can you tell I'm not very excited about blogging anymore? However, I do like to keep a record of more of the details of a project than what I put on Instagram, so here is where they shall go... when I get around to it. Ha.

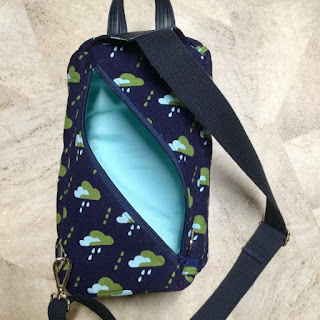
This is from the newest pattern by Linds Handmade Designs, the LindSling, which I tested. As the name states, it's a sling bag. The fabric I used is babywale corduroy, designed by Jess (a.k.a. HowAboutOrange) for Cloud9 Fabrics several years ago. The strap is cotton webbing, and the grab handle is made from a scrap of faux leather.


It has a zippered pocket on each side, perfect size for a cell phone or anything else you might decide to use it for.


It also has a zippered pocket on the back, which sits against your back when wearing it, thus making it anti-theft for your more valuable items. Your phone could go in there, too, but it wouldn't be quite as handy to get at as from one of the side pockets.

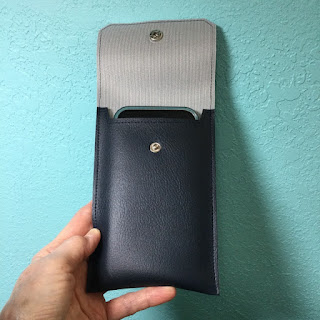
Speaking of that phone, the pattern includes a little bonus pattern for a phone pouch that slides onto the strap, so it can actually be worn on your front. Can't be any handier than that!


It's super easy to make...


... it doesn't even have to be lined!

Here are a few progress photos I remembered to take. The side pockets;


The back with its diagonal zipper:


And here's the inside lining, just about to be bound. Yes, there's binding on the inside seam all around, but it's pretty easy to do, and even if you don't get it done perfectly, the binding really doesn't show anyway, as it's tucked inside.

I used waterproof canvas for the lining, which made it easier because it requires no interfacing, and since it doesn't fray, I also used just a single layer of it for the binding.


Since it's a little hard to take a photo myself of something on my own back, here's the cover of the pattern so you can get some size perspective.
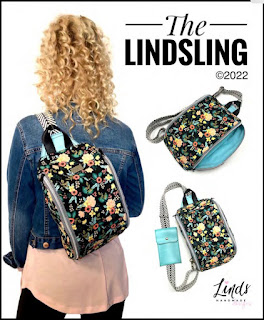

The actual size is approximately 7" wide by 4" deep, and 13" tall. I didn't get this post written in time for you to take advantage of the introductory sale price, but all of her patterns are reasonably priced anyway, in my opinion!
Tuesday, January 11, 2022

Tiny Triangle Coin Pouch

Hi, and Happy New Year to anybody still hangin’ in there with me and reading the ol’ blog! Thanks for coming back, and for your patience with my slowness. I make no promises for 2022, either with the blog or otherwise. May things only get better! 

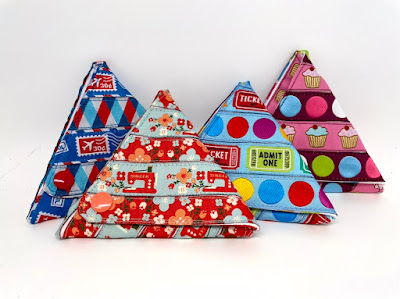
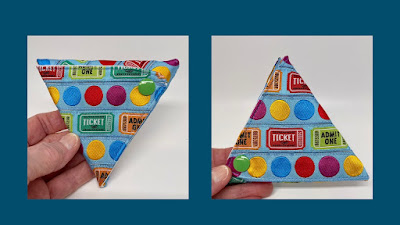
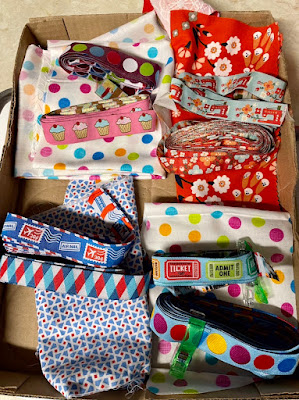
Before Christmas, I came across a tutorial from Sew4Home for a cute little origami triangle pouch, thanks to Rochelle of eSheep Designs, in a post she titled “Last Minute Holiday Gifts to Sew”. Now I wasn’t even planning to sew any gifts for Christmas, but these were so adorable and I happened to still have a lot of ribbons Jess had designed several years ago for Renaissance Ribbons, so I decided to give one a try. Here’s my first one.

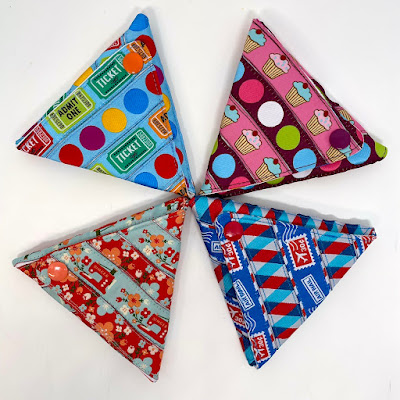
The front and back:


It can be opened from either side.

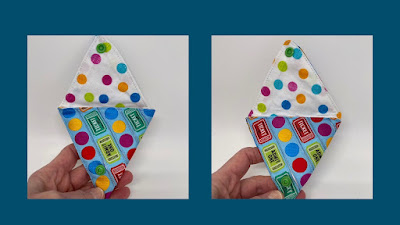
Here’s the inside:


When completely unsnapped, it opens flat. I guess I neglected to get a photo of that. Use your imagination. :)

I was rather pleased with the ribbons/fabric combo I found!

I gifted that one to a friend. Since it was fun to make and I had lots more ribbons, I decided leave other Christmas preparations til the last minute (so it would feel more like normal, y’know?) and make some more. It wasn’t exactly easy finding ribbons and fabrics that would work together, but I managed three more combos, plus a duplicate of the first one. Sometimes it pays to buy fabric grab bags!


Here are the results:


That was the extent of my pre-Christmas sewing. It was fun, but I’ve had my fill of these pouches now. I’m ready for another pattern test, and one will be available very soon, maybe even today - yay!

On a side note… back to Rochelle from eSheep Designs, she wrote a blog post entitled “So Done With 2021…” I encourage you to read it.

Sunday, December 5, 2021

Eli Laptop Case

The latest pattern from Linds Handmade Designs is the Eli Laptop Case, and I once again tested for her. The pattern is for a zip-around case, and it can be adjusted to fit nearly any laptop or even a smaller device. Since I don‘t have a laptop myself, I made a case for my iPad.


Below what it looks like inside. It has corner anchors to help hold it in place. If making it for a laptop, it would also have elastic at the other corners.


I made the spine from a scrap of cork fabric. The pattern calls for webbing for the handle, but since I didn’t have any the right size on hand, I used cork scraps there, too. Getting down to the last few inches of my cork, I had to splice the handle, as you can see.


Using cork there made it too thick to turn under the ends, so I just did one layer and edge painted the raw edges. I also repositioned the handle a little, due to the smaller size of the iPad.


The fabric I used for the exterior is waterproof canvas, and the lining is a chambray(?) fabric scrap left from another project. The case is padded with fusible foam.

You can use measurements with a ruler and rotary cutter for your pieces, or if you’re not into doing the math calculations, there are pattern pieces and a brilliant way to get them the perfect size without having to do math at all! 

The pattern is at a discount price through tonight (12-5-21), so if you’re interested, grab it now. You can find the pattern here.

This is probably it from me until next year, so here’s wishing you all a wonderful Christmas! ❤️


Friday, October 8, 2021

Stephie Shoulder Bag

Linds Handmade Designs has been at it again! I just tested another terrific new pattern, the Stephie Shoulder Bag. Here's my version, made from one of Jess's (aka How About Orange) barkcloth designs for the outer main fabric, faux leather strap and accents, and waterproof canvas for the lining.


The back has slip pocket perfectly sized for your phone. (If you've followed me long, you know I love a good fussy cut!)

I love the fancy boxed corners. They're easier to make than they look!

The top closes with a recessed zipper to keep your things secure.

There's a zipper pocket inside, trimmed with the faux leather. The installation is pretty unique, too... and easy! 


There's also a divided slip pocket on the other side of the interior.


It's a good-sized bag! Here's a selfie of me with it. You can fit a LOT of stuff in there!


It was easy to make - my old vintage Kenmore sewed through it like a breeze, and I think any domestic machine would also. I enjoyed the process. The tassel was a new experience for me - very easy and rather fun. All in all, it's a great pattern that makes a very useful bag, and you can get it (as well as everything else in the Linds Handmade shop) at a discount price through this Sunday, October 10th.

Saturday, August 21, 2021

Charlie Convertible Backpack

Didja notice? It hasn't even been two weeks since I posted last. Woohoo! Haha.

I'm happy to report that I tested another bag for Erin Gilbey of Dog Under My Desk. It's a pleasure to test her patterns, because she does such a great job that there's very little tweaking to do. It's been a while, but that happens when one is busy with a newborn baby. Erin had the baby, not me. Just to clarify. ;-P 

Okay, Grandma G... quit being silly and introduce the pattern! It's the Charlie Convertible Backpack, named after that brand new baby boy. The "convertible" part means that it's an on-the-shoulder tote that can quickly become a crossbody bag or a backpack, all by a slick move with the straps. It's unbelievably easy to adjust! But that's Erin for you... she's a design genius! 

Here's my Charlie in shoulder mode:


In backpack mode:


I don't have a photo of it in crossbody mode, but it's just a matter of lengthening out the tote straps using the sliders.

It can hold a lot of stuff, as shown by my lovely bottom. (There was some discussion in the tester group about our bottoms. Heehee.) The bottom is 14" wide by 5" deep, and the bag itself is 12½" tall.


It closes snugly at the top with a zipper.


The interior has a generous-sized zipper pocket...


... and a divided slip pocket, pleated for lots of room.


As I was in between cataract surgeries for most of the sewing of this bag, I think I managed to sew fairly straight, even though my vision was somewhat wonky. I was thrilled that my rivets came out even, too... on the first try. :)


Here's the back:


I love this bag, and if I were into carrying big bags myself, I'd make another one. This one is going to Courtney's mom, and she selected the fabrics from some options I gave her. No, they're not Jess's designs this time. The prints (quilting cotton) were gifted to me by a very generous friend whom I've never met, and the gold solid is a canvas I had on hand.

The pattern is another DUMD winner! Every construction detail is covered, with step-by-step instructions and actual photos to show what's going on. People are always asking bag designers for videos these days, but I assure you, a video is not necessary with this or any of Erin's patterns.

If you're interested in purchasing, you can get the pattern here, and it is at a discount price through Sunday, August 29th!