Monday, September 28, 2015

Moonshine... or rather, lack thereof

Did you see it last night? The blood moon eclipse? It was so nice that it was at a reasonable hour for watching and taking photos, rather than in the middle of the night, although I have been known to be up taking pics at that ridiculous time, too. 

I almost didn't get to see it, due to clouds coming and going. Here are a couple of practice shots that I took before the eclipse started, just to get the feel for camera settings.


Then as the eclipse was starting, it got cloudy, so I missed the beginning of it, but thankfully the clouds left long enough for me to get the rest of these shots. I didn't bother with the tripod, so I was kneeling on the deck with the camera braced on the railing to hold it still enough for the long exposure time. I'll just say my knees were a little stiff when I got back up again. ;)


That was all I got before it got covered over with clouds again. It was fun while it lasted. Sometime I'd like to invest in a really good zoom lens for even better shots! Maybe.

Friday, September 25, 2015

Fabric!

I found these Instagram posts pretty interesting, and I thought you might, too, so I blatantly did a screen capture of Cloud9 Fabrics' photo. I didn't think they'd mind my promoting their fabrics a little more. ;)

Here we have Jess's new Typography fabrics in the overseas mill, "getting ready to roll".


The next screen cap is from Jess's Instagram, which is a repost from Cloud9. This is some of her fabric getting rolled onto the bolts and ready to ship.


Kinda cool to see how that's done, huh?

Anyway, this means that the fabrics will soon be on their way to Cloud9 (if they're not already) and then off to retailers! Exciting!

Wednesday, September 23, 2015

Nature's glory!

We had a most glorious sunset a few evenings ago. Here are the pics I took, completely unedited. Enjoy, especially those of you who can't see the sunsets from where you live! (Click any photo to enlarge.)


As I was taking pics, I turned around and saw this:


It's the sunset reflected in a window on our house. It looks like some kind of a wild wall hanging, doesn't it? Or maybe like the house is on fire. :)

Monday, September 21, 2015

Triple Zip Pouch #7

I decided to do a little "scrapbusting" with what I had left of Jess's Typography fabrics. Since I had inherited my mother-in-law's rotary cutters after she passed away, I needed somewhere to store them besides a zip-lock bag. I think the perfect storage solution is a Triple Zip Pouch, since that's what I use for my other set.

At the link above is a free tutorial. The little pouches are so fun to make, as well as pretty quick. The hardest part is deciding the fabric/zipper combo - so many possibilities! This time I went with just one fabric on the outside. It was the only thing I could make work with the zippers I had on hand, and I like it this way!


Zippers are so fun! Inexperienced sewers fear them, but really, in a bag they're so easy!


(Now if the camera would've just gotten the colors right. Aargh. The fabric color is really teal, and the orange zipper is more like in the other pics, which were taken with my iPad.)

For the linings, I used the leftover Lorem Ipsum, and since there wasn't enough of the teal to do all the pockets, I used the purple, too. I don't care if the linings are perfectly color coordinated, and I think the different colors are kind of fun, too.


The cutters fit perfectly in there. And the smallest pocket can hold the spare blades.


I've made a number of these pouches (6, in fact) before. You can see them all here. I've gifted some, and others I'm using (and there's one I can't figure out what I did with, but it's probably buried under some fabric somewhere - ha!). They're good for so many things, like Sharpee markers, for example, which is what I use this one for.


The front one below, which was my first one ever, is still my favorite. It contains my original set of rotary cutters, and it gets a lot of use!


I do my main cutting upstairs on the kitchen table, so that set stays up there. This new pouch will stay down in my sewing room where I've added a small cutting mat for those little trim jobs that I don't want to have to run upstairs and dig everything out to cut.

So that's my latest sewing project. I think for the next one, I'm going to do something totally different. And you probably won't get to see it - ha! Think on that one awhile. ;)

I mentioned in a previous post that someone was making something out of ALL the Typography fabrics. Have you guessed what it could be? Well, it's finished, so you can see it now. I have a friend who is an awesome quilter. You can see a quilt she made for me here. I recommended her to Cloud9 as a possibility for making a quilt out of Jess's fabrics (what else would take that many different fabrics?), and they decided to use her. She was thrilled to do it, and she did a wonderful job. They gave her the design they wanted her to make, and she had to figure out how to make it work! She sure did! You can see the quilt here. And if any of you quilters out there are interested, I believe the pattern is going to be free!

Thursday, September 17, 2015

SEWING with Courtney!

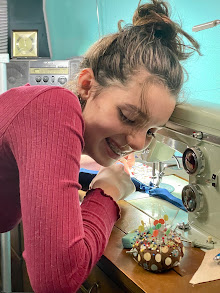
On Courtney's last full day here before school started, we decided it was time for her to try a little sewing project... on the REAL sewing machine! She loves bags, so I found a simple example online, and we went with that plan.

She also loves pockets, and she wanted one on the inside. Since we weren't lining the bag (I serged all the fabric edges to prevent fraying), I said we would also need a pocket on the outside to cover up the stitches from the inside pocket. She chose her fabrics that day but we didn't have time to start sewing (much to her disappointment), so we got at it this week Tuesday when she was here after school.

Here she is, her very first time at a real sewing machine, stitching some of Auntie Jess's ribbon onto her outside pocket for trim.


Next the pocket went onto the outside of the bag.


My biggest worry was over little fingers that could slip under the needle, so I was watching like a hawk, but she was very careful (and I was ready to grab the hand crank if she got going too fast)!


After sewing on grosgrain ribbons for straps, she then sewed the back and front of the bag together.


Here she is with her brand new bag, proud as can be (and rightly so, as she did a wonderful job for a first-ever sewing machine project)!


(I thought she happened to be very color-coordinated that day, right down to her shoelaces!)

A closer look at her bag, made out of one of Auntie Jess's earlier fabrics:


She did fabulously! She was very careful about everything. The hardest part was controlling the speed with the foot pedal, but she'll get the hang of that soon enough. I think she's going to be a great seamstress someday... Grandma's little protégée! Grandma is very proud, too [even though it's hard to believe she's actually old enough (8) to be sewing]!

I took a couple of videos with my iPad, not knowing if I could find a way to get them onto the blog or not, but I discovered that I can email them to myself and save them on my computer, then upload them. So here you can see a couple quick clips of her sewing in action (apologies if you're on a tablet... they probably won't work there (?) ). Next time I'll know enough to turn the iPad to landscape, since I know I can use them here. ;)


She started pretty slowly, but she gained speed with her gained confidence.


I have no doubt her brain is already cooking up the next sewing project. Whatever it is, you'll be seeing it here! :)

Tuesday, September 15, 2015

Oops! A bit of a late update

I was reminded in the comments yesterday that I had never shown you an update of Jess and Alex's front yard after we did so much work on it last spring. Unfortunately I totally forgot about it, so I don't have any photos of the entire yard, and when I asked Jess about it yesterday, she said everything is kind of end-of-summer worn out now and beyond pretty. So I'll just show you the only pics I have saved that she had sent earlier. Here are her gorgeous crazily-blooming begonias, with the hydrangeas in the background.


That's all I have of the font yard, but here are a couple pics of her climbing black-eyed Susan vine from her back yard, with some daisies in front.


They're on a trellis. They were kinda slow to get going, but the flowers are very pretty.


(She gave me some of her seeds, and I also have them growing up the posts under our deck now. Fun!)

Sometime after we were there, she also added this beautiful caladium in the back yard.


That's all the photos I have. Sorry.

Monday, September 14, 2015

Success!

The boxers fit!


I love it when that happens!

Friday, September 11, 2015

Get Carded Wallet #10

Jess received the package of all the Typography projects today. She had fun opening and examining everything, and besides all the stuff she'd seen and was expecting, she also found a little surprise!


I'd made her a couple of Get Carded Wallets before, but neither of them was a very good color to go with her new Sandra Saddle Bag, so I decided to make one to match it out of the scraps I had left. Now doesn't this look like the perfect set?


The inside matches the lining of the larger bag, although I had to use some of the main fabric for the center part because of the one-way design of the Lorem Ipsum fabric. It was a pretty quick item to cut out and sew, especially since I'd made 9 of them before and knew how things worked.


One of the things I like best about this wallet is that the credit card slots face the center, so that when the wallet is closed, there's no chance of the cards slipping out.

Now to use up some more of those Typography scraps. I already have a plan....

Wednesday, September 9, 2015

Fooled ya this time!

Bet you didn't think I'd have my final Typography fabric project done for a long time yet, did you? Well, surprise! I even finished it already last night, but today I had to take photos and then get everything packaged up (which was interesting, due to the various sizes and shapes) and taken into town to mail to Jess, plus do the other things of daily life, so I'm just now getting around to showing you.

This was a very quick project. Probably the most time-consuming part of it was printing and cutting out and taping the pattern pieces together. It took 12 sheets of paper, which is much more than any bag project I've sewn! The cutting out of the fabric took 5 minutes at the most. The sewing was very quick also.

Soooo... here you have it - boxer pajama shorts (for Jess, not me)! 


They're made from a tutorial you can read about here and download free pattern pieces. If you decide to make some, be aware that you have to print the pattern pieces twice, thus the total of 12 pieces. The front and back pieces of the shorts are laid out one on top of the other. An alternative way of doing it would be to print and tape together one set, then just trace the smaller pattern piece off of it. I didn't think of that at the time. Duh.

The only part I did differently than what was suggested was the elastic. The tutorial calls for a casing with the elastic inserted inside, but I like to use "pajama elastic" and sew it right to the fabric on the inside. I think it's just a nicer finish, and you don't have to worry about the elastic rolling. You can see some of the inside of it in the top photo, and here's a closeup of how it looks on the outside.


Most men's pajama pants are made this way (aren't boxers, too? I confess I don't even know!), and I've made a number of them for Grandpa back in the old days when I was more ambitious and sewed garments for the whole family. Now they're just easier to buy. Bags are more fun to sew, and you don't have to worry about fit.

Speaking of fit, we won't know if these fit Jess properly or not until she receives them. If they're good (and maybe even if they're not), hopefully she'll model them and send a pic that I can show you later.

So that's it for my Typography big stuff. Now we just have to wait for the fabric to reach the stores sometime this fall! However, someone I know is working on another project with the entire Typography fabric line. Maybe I can show that to you when it's finished, or at least link you to it when the time comes.

NOW what am I gonna sew?! Ha. I have a list a mile long of things I want to make. And some Typography scraps left to play with. The question is "what should I do first?"

Tuesday, September 8, 2015

In case you're interested...

I keep seeing these two lovely bags sitting together, since I haven't sent them off to Jess yet (because I have one more project to sew from the Typography fabric), and I thought maybe someone might like a size comparison photo. (Besides, with them there in my photo tent, I just couldn't resist another pic.) So here you have them!


The last project is cut out and shouldn't take long to sew up (have you heard that from me before?), so hopefully you'll be seeing it soon! I'd better get at it...... !

Thursday, September 3, 2015

Crafting with Courtney

Last week when Courtney was here, she got inspired to write a book! So she did. It's a very tiny book, with very tiny writing. Here's her little book, which she is very proud to show you! (We forgot to take pics of it last week, so she brought it along this week so we could do so.)


(Sorry... I don't remember what's under her thumb!)


Just so you know where Courtney got her inspiration... we'd come across these tiny books written lotsa years ago by her Auntie Jess. :)


I sure love both my authors of tiny books!!!!

P.S. Like those fancy fingernails? I just noticed they match the book colors! :)

Tuesday, September 1, 2015

Trail Tote

It.Is.Finished! "It" is the Trail Tote from the pattern by Anna Graham of Noodlehead. It wasn't a difficult pattern to sew. It's just that... well, if you've been following my blog long, you know that... I'm slow. Especially in the summertime. So without making you wait any longer, here it is!


It's a large tote bag with an adjustable crossbody strap, piping trim on the sides, and has no gusset but instead darts in front and back that give it more room. It's a fun bag!


The fabric is from Jess's new Typography line for Cloud9 Fabrics. The outside is the teal "Wood Type", and the inside is teal "Lorem Ipsum", with a solid orange (of course!) for the strap and piping.

It fastens with a magnetic snap, and there is a large slip pocket inside besides the zippered pocket on the outside.


The pattern is free(!) and it can be found here. As it says on the cover, the pattern level is Experienced Intermediate... "I know the ropes and would like to test my skills!" I would say that's pretty accurate. You would do best with some bag-making know-how already in your pocket.

At photo-taking time, there was no one to hold the bag or take pics of me doing so, so I'll just show you the pics from the pattern cover for size reference. There are two sizes in the pattern, so here they both are, modeled by Anna herself. The one I made is the larger of the two.


Anna also has more fun photos and even links for a couple other free patterns in her blog post here.