Wednesday, May 29, 2019

Harbor Hipster

This post got delayed awhile, due to our crappy, ever-raining, dark, dreary, not-good-for-photos weather. I'd taken pics but wasn't at all happy with them, so finally got some re-takes. Actually, I did not take them myself. Jess and Alex came for the holiday weekend, and with them came two days of PERFECT(!) weather, so knowing Jess takes fabulous photos, I asked her to do them. I'm so glad I did - they turned out so much better than my previous ones. Plus, I may have learned a little something about getting nicer photos, too.

So here we have the Harbor Hipster, the newest pattern by Dog Under My Desk, which I was privileged to test. I love testing Erin's patterns. She always has such unique ways of doing things that are so helpful in making her bags come out looking great, and I always learn a tip or two in the process.


I know that Erin makes a bazillion prototypes herself before she sends her patterns to testers, so my job is never very hard to do, and I end up with another great bag! This one is just so cool - I love it! It's just the right size for a quick trip to town or going out for a walk. It even holds a water bottle if you happen to carry them. Because the back side is flat, it fits nicely against your body and is very comfortable to wear.

Through a lot of work, Erin managed to make this curved zipper front not only fit perfectly to give the bag some depth but easy to sew. VERY easy!


Inside there's a zippered pocket plus a divided slip pocket.


On the back, there's another zippered pocket, which gets sewn onto the bag very easily, even though it may look complicated. That Erin's a genius, I tell ya! 


That pocket is very easy to access and perfect for a phone of any size or whatever else you may want to put in it.


There's an adjustable crossbody strap so you can carry it across your body or just on your shoulder, however you prefer.


Here I am in my fancy pose (ha), giving you an idea of the size of this bag.


The pattern can be purchased here. I apologize for not getting this post done in time for you to take advantage of the discounted price, but Erin's patterns are definitely worth the full price and more, they are so good.

When I sewed this, I took a bit of a risk in using some heavier fabrics. The outer print is from Jess(a.k.a. How About Orange)'s  Holding Pattern line of barkcloth that she designed for Cloud9 Fabrics. The inner lining is from Jess's most recent design for Cloud9 - her Business Class rayon. I used a solid canvas for the straps and also the back and back pocket lining. The only place that got a little thick sewing was where the strap connectors are attached to the bag, but my good ol' 49-year-old Kenmore got the job done with no problem.

Did I have fun matching up that print on the outside? Let's just say that I like the challenge of fussy cutting, and this was definitely that! It nearly fried my brain, to tell you the truth. But I love how it turned out - even better than I'd hoped. Hurray!

Tuesday, May 21, 2019

Classic Shirt

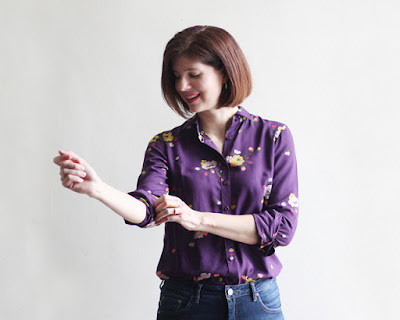
I know, I know... I promised you over 3 weeks ago that I'd show you something pretty I'd made. I even teased you with this photo.


Finally I can show you the rest of it! This project has been a lesson in developing patience, and I won't bore you with all the details. Just know, folks, that this time it wasn't my fault! Ha!

I didn't take many in-progress photos, but here are a couple. A pair of pretty sleeve plackets...


... and the finally acquired perfect buttons.


Voilà! It's a Classic Shirt, completed!


I just today got some long-awaited photos of it being modeled on its owner, whom most of you know as my daughter, Jess (a.k.a. HowAboutOrange). I guess good photographers have a busy schedule and can only be used when they're available. ;)


Apparently she really likes the curved cuffs.


And then she hides them. Oh, well. LOL


The gorgeous fabric was designed by Jess herself for Cloud9 Fabrics. It is the Poet print from her Business Class collection of rayon. It's available in stores now.

The pattern I used was the Classic Shirt by Liesl + Co.


It was a nice pattern to sew from, although I think when I use it next time, I'll try a couple of different techniques from my old vintage patterns. "Next time"? Yes! I have fabric (more lovely rayon) and plans to make one for myself. But don't hold your breath, as it may not get done before fall. Although if our crazy weather doesn't warm up soon, maybe I'll want it before that. One never knows.

I just completed another bag pattern test. The pattern will be released in the next couple of days, so soon I can show you that, too. Then another pattern test from a new-to-me designer is coming up the end of this week, so I'm keeping my sewing machine busy!

Sunday, May 5, 2019

Pop Pouch

If you've been following my blog for very long, you know that I've tested a number of patterns for LiEr of the ikatbag blog. The most recent one was the Port & Sort Tote nearly 3 years ago, although I did proofread and eventually sewed the Bunny with its coat just over a year ago. LiEr writes quite unique patterns, and one I particularly had fun with (besides the Bunny) was The Menagerie pattern because not only was it super cute but there was so much potential for other critters to be made from it.

Well, she's done it again! This time it's a pencil case of sorts... but not just any simple pencil case. It stands upright and looks like this when closed.


Or it could look like this!


Opened up via the zippered top, and you get this.


Or another view looks like this. (Yes, I had a little fun matching the print.)


The zipper tab/handle is a piece of grosgrain ribbon I'd bought in a grab bag. It doesn't exactly go that well, but it was the closest thing I had.


That same ribbon is also used to finish off the inner cup, although it doesn't show unless you lift up and peek under the outer cup, but that edge did need to be bound with something, so why not?


The uniqueness of this pouch is that it can be used at any height. The outer part slides up and down, yet it's constructed such that it stays at the height you put it, so it exposes the contents 'just right'. Here are some examples of it at different heights.


The bottom right photo shows that there are also some little slip pockets on one side for if you want to keep some of the contents separated from the rest and easy to get at. It's a cool little pouch!

The pattern is definitely not for beginners. It's got some fiddly parts to making it, particularly like sewing on the firm round base in a small area. It also has somewhat thick seams in places. But if you're an experienced sewer and have wrangled a bag or two, you can make this. The explanations and photos are very clear for putting it together.

This is a great scrap buster project. I used a bit of canvas that Jess (a.k.a. How About Orange) designed a few years ago for the outer fabric. The inner cup part is from a solid canvas, and the lining is ripstop nylon. LiEr wrote a very helpful blog post about the different fabrics and interfacings that can be used, and you can read that here. The pattern can be purchased in her pattern shop here (it isn't available as of this writing but will be very SOON). There are photos of pouches made by the other pattern testers in this post.

These pouches would be great little gifts... for most anyone! Start your Christmas sewing now! ;)