Wednesday, September 23, 2020

Zip Mask Case

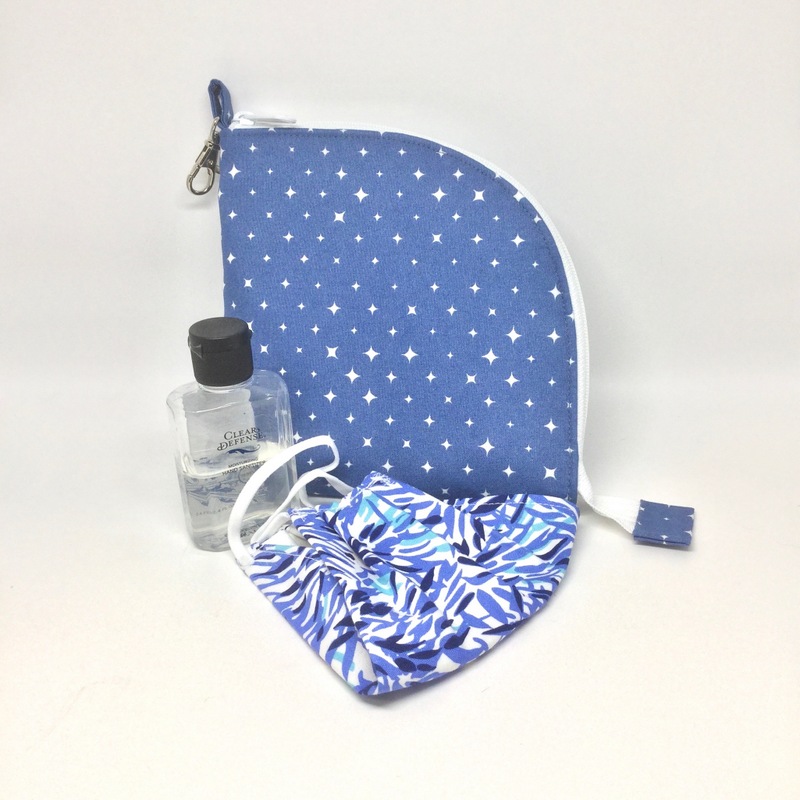
In my previous post, I mentioned that I'd tested another pattern. This time it was another one by Erin of Dog Under my Desk, the Zip Mask Case. Her patterns are always very detailed and easy to follow, and this one was no exception. It was fun to make, because it was so quick and easy (kinda what I needed after sewing two garments and doing another bag pattern test). Even the curvy zipper was easy, thanks to Erin's know-how.

Here is my little mask case, shaped just right for those masks we're all supposed to be wearing these days.

It has boxed corners to give it a bit of depth.

It also has an inner pocket (which might be hard to see in this next photo) to hold a small bottle of hand sanitizer, gloves, and/or a plastic bag for used masks.


There's a loop at the end of the zipper where you can add a swivel clasp hook like I did... or a D-ring... or leave plain for hooking a carabiner.


So there ya have it, a very handy little pouch. Actually, it could be used for a lot of things besides masks, too. I'm sure I will be making more.

Here's another photo for size reference.


Erin has also written (in her very detailed, easy-to-follow way) a couple of FREE patterns for two different mask styles, with several options for elastics, nose wire channels, filter pockets, etc., and tips for tweaking to get the best fit. The patterns come in sizes from extra small to extra large, so a size for everyone.

Here is my fitted style mask...

... and this is my pleated style one.


Both patterns can be found here [plus there is a "Tip Jar" (requested by her followers) just in case you really appreciate all the work Erin's gone to in making these FREE patterns the same quality as her other ones and want to contribute something].
 

Tuesday, September 8, 2020

McCall's Marina dress

The fabric print in this post might seem familiar to you. It's the same as on the sweatshirts I showed you in this post, only the color and fabric are different. The sweatshirts were made from french terry, but Cloud9 Fabrics decided the print would also look good on rayon; it certainly does, and in a new color - orange! Of course this thrilled Jess, Ms. HowAboutOrange herself, so she had to have a dress made from it. She chose the McCall's Marina dress pattern (M8090). It was pretty easy to sew, although gathering and pinning the ruffles was somewhat time-consuming. 

Here she is modeling it. She describes the fabric as "so light, soft, comfy, and orange!"


(Nice that she had coordinating flowers for the photo shoot, right?)

Yes, I made her a mask to match, because when wearing something this pretty, your "accessories" must coordinate, right? :)


Well, writing this post went pretty smoothly. Maybe Blogger is getting the kinks worked out? Good thing, because I have another garment to blog about (still awaiting pics). Aaaand I may have tested another pattern that I want to show you, too. Come back and check later.....


Tuesday, September 1, 2020

Bend and Snap Clutch

No, I haven't quit blogging yet, but I'm very, very close to it. I'm having even more trouble with this post than I had the last time, and I'm doing it on my computer. I wasn't about to attempt it on my iPad again at this point.But let's get on with it before Blogger gives me a migraine.I recently completed another pattern test for Linds Handmade Designs. That Lindsay has really been cranking out the patterns... and they're good ones! Great ones, in fact! This one is called the Bend and Snap Clutch (if you've seen the movie Legally Blonde, you'll make the connection). It has three zipper pockets, six card slots, and a clear ID window. It can be used as a crossbody bag, carried as a clutch or by the handle at the top, or it can have a short strap and be used as a wristlet. Here is my version, made with one of Jess's barkcloth designs on the exterior and faux leather on the inside. It bends in the middle and snaps closed with magnetic snaps. There are also a few extra rivets to add some bling.Since I can't figure out how to get my cursor down below the photos at the moment, I'll finish up here, and you can just enjoy the photos. The pattern can be found here.I hope I can get one more post in before I give up blogging entirely, because I've made a couple of garments and am just awaiting photos of them being modeled. Soon, hopefully!


Sunday, August 2, 2020

Family Travel Organizer

Welllll.... Blogger’s been changing things again. Not sure how I like it. If I don’t, this may be my last post. But I do want to get this one out there, because it’s another new pattern, and it’s on sale only through the rest of today (8-2-20), so if you’re interested, you’ll have to be quick to purchase. 

I tested another pattern for Linds Handmade Designs, and this one is the Family Travel Organizer. It has pockets sized for passports, plus it has credit card slots, a long slip pocket, a zipper pocket, and even a loop to hold a pen. It would be great for those international flights that nobody’s taking much these days... but hopefully will again before too long. Hopefully. 

Linds has such a great way of putting her designs together simply yet functionally, and her patterns are easy to follow. This one was quick and fun to make. I used one of Jess’s barkcloth fabrics for the outside of mine. Any number of other fabrics could be used, and some of the other testers used cork, which worked beautifully. It fastens with a snap... I used a metal spring snap, but KAMsnaps work as well... or you could use velcro or a magnetic snap.


Soooooo... things are not going well here in A Photo’s Worth as far as writing this post. Grrr. Among other things, I can’t figure out how to add a link to the pattern, so if you want it, just go to etsy.com and search for Linds Handmade Designs. The pattern will be in her listings. The good news is that everything else in her shop is on sale through tonight, too!

This is frustrating and may be just that last straw I need to quit blogging, which I consider from time to time, anyway. We’ll see how this posts. If I decide to quit, I’ll come back to say goodbye... if I can figure out how, that is. 🙄

Please let me know how you see this! Do you see the whole photo? When I saw it in my blog reader, they were complete, but in Safari on my iPad, the right sides were cut off. Any other issues?

Update: Well, I am at my PC now and managed to correct some of the mess that doing it on the iPad had made, but not all of it. The link to the pattern should now work, hopefully. And I 'think' you should be able to see both photos whole now. But it's still not right and some things don't work as they should when writing the post. Maybe it's just glitches that Blogger needs to work out yet. We'll see. 

I was just getting used to writing posts from my iPad, but if I'm going to continue, it looks like it'll have to be back at the PC... for a while, at least. IF I continue. 

Please let me know what you see from a tablet, and particularly from a phone. I don't have a cell phone (believe it or not!), so I can't test it that way. If anything seems strange, I'd appreciate your letting me know. TIA!


Monday, July 20, 2020

Pocket Pal #2

In my last post, I mentioned that I had one more item that I’d sewn but was waiting until it was received before I would post it so as to not spoil a surprise. That’s finally happened, and here it is:
                           

Look familiar? Yep, it’s another Pocket Pal like this one, only it’s made from a different leather. I’ll show you the surprise in a minute. You can refer to my other post for details, but I thought I’d show you some progress photos. The leather I used is another from the box of scraps we got from Amazon. It’s really nice and soft, and easy to sew. Here it is, ready to have the zipper stitched in. Also note there is a slight difference in that I rounded the corners, as requested by its recipient. Doing so made it just a bit more challenging, but not terribly much.


This leather was a bit stickier to sew than the other one, so I tried out a tip I’d read online somewhere a while back. It was to put some kind of powder on it to keep it from sticking to the presser foot and plate. It worked like a charm. It didn’t take much... I just dipped my fingers in it (I used cornstarch) and rubbed them on the leather. As you can see below, it only took a tiny bit so it wasn’t really messy, and it was easy to wipe off afterwards. I used a soft napkin just because it was handy, but a microfiber cloth would work great.


Here’s the lining after it was applied. Kinda cute, huh?


It becomes a very slim wallet that easily fits in either a front or back pants pocket.


So here’s the surprise for the recipient, who just happens to be Jess. She loves kitties, and I thought it would be fun to have one peeking out at her when she opened the coin pocket. She loved it! She also loves books, so the fabric was perfect for her.


I remembered to add my label, too, and didn’t even have to glue it in this time. :)


So here you have it...


... and here you can compare it with the first one I made.


That’s it... I’m all caught up posting everything I’ve sewn. However, I have two garments and at least one pattern test coming up this week. Time to get the sewing machine in gear again!